12th October, 2022
Android RecyclerView is an improved version of ListView and GridView. It has the ability to display data horizontally, vertically as well as expandable. RecyclerView provides lots of features that gridview and listview do not have. In this section you will learn how to create a simple RecyclerView with custom adapter.
Step 1: Create New Project
Create a new project in Android Studio from File ⇒ New Project and select Empty Activity from the templates.
Step 2: Add Dependency In Gradle
Android RecyclerView is a part of the Android Support Library so you have to add it in the gradle to use RecyclerView.
dependencies
{
    implementation 'androidx.recyclerview:recyclerview:1.1.0'
}
Step 3: Add RecyclerView to your Activity Layout
After adding dependency for RecyclerView you can now add RecyclerView in your layout.
<?xml version="1.0" encoding="utf-8"?>
<RelativeLayout xmlns:android="http://schemas.android.com/apk/res/android"
    xmlns:tools="http://schemas.android.com/tools"
    android:layout_width="match_parent"
    android:layout_height="match_parent"
    tools:context=".MainActivity">

    <TextView
        android:layout_width="wrap_content"
        android:layout_height="wrap_content"
        android:text="www.CodestringZ.com" />

    <androidx.recyclerview.widget.RecyclerView
        android:id="@+id/myRecyclerView"
        android:layout_width="match_parent"
        android:layout_height="match_parent" />

</RelativeLayout>
Step 4: Create Adapter
The Adapter is the main code of RecyclerView which has some important methods to handle RecyclerView.
4.1 Model Class
Create a simple model class that represents the country and its details.
package com.codestringz.mytestapp;

class Country
{
    private String name;
    private String capital;
    private String currency;
    private String continent;

    public Country(String name, String capital, String currency, String continent)
    {
        this.name = name;
        this.capital = capital;
        this.currency = currency;
        this.continent = continent;
    }

    public String getName()
    {
        return name;
    }

    public String getCapital()
    {
        return capital;
    }

    public String getCurrency()
    {
        return currency;
    }

    public String getContinent()
    {
        return continent;
    }
}
4.2 Single Row Of RecyclerView
Next create a row of the RecyclerView in the layout resource directory.
<?xml version="1.0" encoding="utf-8"?>
<LinearLayout xmlns:android="http://schemas.android.com/apk/res/android"
    android:layout_width="match_parent"
    android:layout_height="wrap_content"
    android:orientation="vertical"
    android:padding="5dp">

    <TextView
        android:id="@+id/countryName"
        android:layout_width="wrap_content"
        android:layout_height="wrap_content"
        android:textStyle="bold"
        android:textSize="18sp"/>

    <TextView
        android:id="@+id/capital"
        android:layout_width="wrap_content"
        android:layout_height="wrap_content" />

    <TextView
        android:id="@+id/currency"
        android:layout_width="wrap_content"
        android:layout_height="wrap_content" />

    <TextView
        android:id="@+id/continent"
        android:layout_width="wrap_content"
        android:layout_height="wrap_content" />
</LinearLayout>
4.3 Custom Adapter
Now create a custom adapter.
package com.codestringz.mytestapp;

import android.view.LayoutInflater;
import android.view.View;
import android.view.ViewGroup;
import android.widget.TextView;

import java.util.ArrayList;

import androidx.annotation.NonNull;
import androidx.recyclerview.widget.RecyclerView;

public class MyRecyclerViewAdapter extends RecyclerView.Adapter<MyRecyclerViewAdapter.MyViewHolder>
{
    private ArrayList<Country> mCountries;
    private MyRecyclerViewItemClickListener mItemClickListener;

    public MyRecyclerViewAdapter(ArrayList<Country> countries, MyRecyclerViewItemClickListener itemClickListener)
    {
        this.mCountries = countries;
        this.mItemClickListener = itemClickListener;
    }

    @NonNull
    @Override
    public MyViewHolder onCreateViewHolder(@NonNull ViewGroup parent, int viewType)
    {
        //Inflate RecyclerView row
        View view = LayoutInflater.from(parent.getContext()).inflate(R.layout.my_recyclerview_row, parent, false);

        //Create View Holder
        final MyViewHolder myViewHolder = new MyViewHolder(view);

        //Item Clicks
        myViewHolder.itemView.setOnClickListener(new View.OnClickListener()
        {
            @Override
            public void onClick(View v)
            {
                mItemClickListener.onItemClicked(mCountries.get(myViewHolder.getLayoutPosition()));
            }
        });

        return myViewHolder;
    }

    @Override
    public void onBindViewHolder(@NonNull MyViewHolder holder, int position)
    {
        //Set Country Name
        holder.textViewName.setText(mCountries.get(position).getName());

        //Set Capital
        String capital = "Capital: " + mCountries.get(position).getCapital();
        holder.textViewCapital.setText(capital);

        //Set Currency
        String currency = "Currency: " + mCountries.get(position).getCurrency();
        holder.textViewCurrency.setText(currency);

        //Set Continent
        String continent = "Continent: " + mCountries.get(position).getContinent();
        holder.textViewContinent.setText(continent);
    }

    @Override
    public int getItemCount()
    {
        return mCountries.size();
    }

    @Override
    public int getItemViewType(int position)
    {
        return position;
    }

    @Override
    public long getItemId(int position)
    {
        return position;
    }

    //RecyclerView View Holder
    class MyViewHolder extends RecyclerView.ViewHolder
    {
        private TextView textViewName;
        private TextView textViewCapital;
        private TextView textViewCurrency;
        private TextView textViewContinent;

        MyViewHolder(@NonNull View itemView)
        {
            super(itemView);

            textViewName = itemView.findViewById(R.id.countryName);
            textViewCapital = itemView.findViewById(R.id.capital);
            textViewCurrency = itemView.findViewById(R.id.currency);
            textViewContinent = itemView.findViewById(R.id.continent);
        }
    }

    //RecyclerView Click Listener
    public interface MyRecyclerViewItemClickListener
    {
        void onItemClicked(Country country);
    }
}
Step 5: Update Activity
Finally, Open the Activity, Create UI reference of RecyclerView and set the custom adapter for it.
package com.codestringz.mytestapp;

import android.os.Bundle;
import android.widget.Toast;

import java.util.ArrayList;

import androidx.appcompat.app.AppCompatActivity;
import androidx.recyclerview.widget.LinearLayoutManager;
import androidx.recyclerview.widget.RecyclerView;

public class MainActivity extends AppCompatActivity
{
    private RecyclerView mRecyclerView;
    private ArrayList<Country> mCountries = new ArrayList<>();

    @Override
    protected void onCreate(Bundle savedInstanceState)
    {
        super.onCreate(savedInstanceState);
        setContentView(R.layout.activity_main);

        bindCountriesData();
        setUIRef();
    }

    private void setUIRef()
    {
        //Reference of RecyclerView
        mRecyclerView = findViewById(R.id.myRecyclerView);

        //Linear Layout Manager
        LinearLayoutManager linearLayoutManager = new LinearLayoutManager(MainActivity.this, RecyclerView.VERTICAL, false);

        //Set Layout Manager to RecyclerView
        mRecyclerView.setLayoutManager(linearLayoutManager);

        //Create adapter
        MyRecyclerViewAdapter myRecyclerViewAdapter = new MyRecyclerViewAdapter(mCountries, new MyRecyclerViewAdapter.MyRecyclerViewItemClickListener()
        {
            //Handling clicks
            @Override
            public void onItemClicked(Country country)
            {
                Toast.makeText(MainActivity.this, country.getName(), Toast.LENGTH_SHORT).show();
            }
        });

        //Set adapter to RecyclerView
        mRecyclerView.setAdapter(myRecyclerViewAdapter);
    }

    private void bindCountriesData()
    {
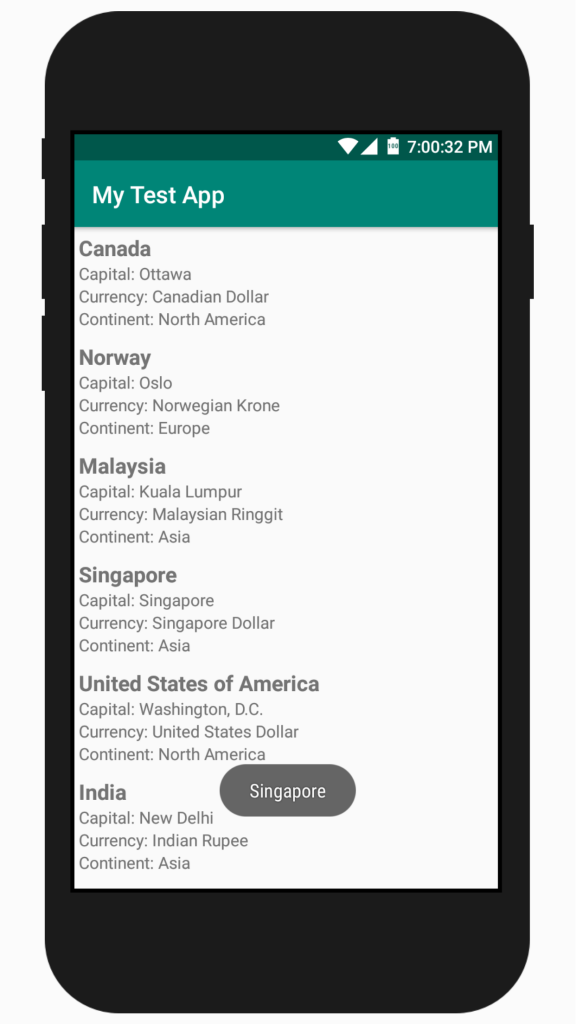
        mCountries.add(new Country("Canada", "Ottawa", "Canadian Dollar", "North America"));
        mCountries.add(new Country("Norway", "Oslo", "Norwegian Krone", "Europe"));
        mCountries.add(new Country("Malaysia", "Kuala Lumpur", "Malaysian Ringgit", "Asia"));
        mCountries.add(new Country("Singapore", "Singapore", "Singapore Dollar", "Asia"));
        mCountries.add(new Country("United States of America", "Washington, D.C.", "United States Dollar", "North America"));
        mCountries.add(new Country("India", "New Delhi", "Indian Rupee", "Asia"));
        mCountries.add(new Country("Brazil", "Brasilia", " Brazilian Real", "South America"));
        mCountries.add(new Country("Australia", "Canberra", "Australian Dollar", "Oceania"));
        mCountries.add(new Country("Russia", "Moscow", "Russian Ruble", "Europe, Asia"));
        mCountries.add(new Country("Japan", "Tokyo", "Japanese Yen", "Asia"));
    }

}
Happy coding!
Output


Well-explained tutorial.