
17th March, 2023
Hello Android Learner, you want to display a list in an application. What will you do? Android has a widget that can be used. In this part we will learn about Android ListView. Let’s start.
1. What is ListView?
ListView is a Android User Interface (UI) widely used in Android application development. ListView is used to display scrollable list of items. A common example of a ListView is our contact book in which contacts are displayed as a list.
Before going to create Android ListView, we need understand List Item (List Row) and List Adapter as they are used to create Android ListView.
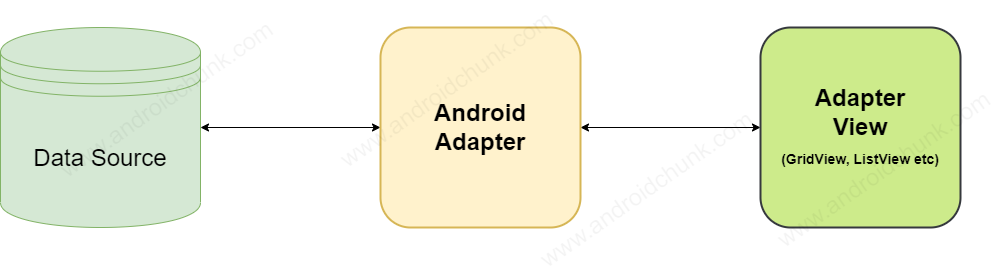
2. ListItem
Android ListItems are the individual rows of the ListView in which the data will be displayed. ListItem can be created by a number of views.
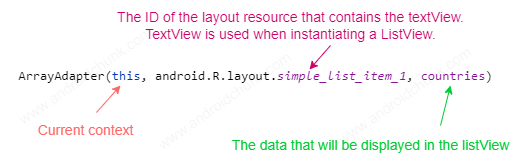
3. Android Adapters
Android adapter is used to fill the data in the ListView. Android adapter acts as a bridge between the views (e.g. ListView, GridView) and data. We can use the adapter through the setAdapter() method. See the image below which shows the function of the Android Adapter.
3.1 Android Adapters used for ListView
| Value | Description |
|---|---|
| ArrayAdapter | It is used to display ListView, GridView with simple Item element. Item can be created from TextView, CheckBox etc. |
| CursorAdapter | CursorAdapter is used to display data by cursor instance when we have to display data from database. |
| SimpleAdapter | SimpleAdapter is used to display static data defined in XML. |
| BaseAdapter | BaseAdapter is common adapter used in ListView, GridView, Spinner, etc. It is a generic implementation of all the above adapters. |
4. Create Android ListView using Android Studio
We can create Android ListView in two ways:
4.1 Create/Add ListView in XML layout file
Open the XML layout file in Android Studio, select ListView from the palette and add it to the layout.

The source code is given below.
<?xml version="1.0" encoding="utf-8"?>
<LinearLayout xmlns:android="http://schemas.android.com/apk/res/android"
    xmlns:tools="http://schemas.android.com/tools"
    android:layout_width="match_parent"
    android:layout_height="match_parent"
    android:orientation="vertical"
    tools:context=".MainActivity">

    <TextView
        android:layout_width="wrap_content"
        android:layout_height="wrap_content"
        android:text="Hello World!" />

    <ListView
        android:id="@+id/myListView"
        android:layout_width="match_parent"
        android:layout_height="match_parent" />

</LinearLayout>
4.2 Create ListView Programmatically in Android
Alternatively we can create Android ListView from a Kotlin/Java file. Create an instance of the ListView class by passing an activity context as a constructor parameter. Add the listView to the layout via the addView() method.
package com.androidchunk.hellolistview

import android.os.Bundle
import android.widget.*
import androidx.appcompat.app.AppCompatActivity

class MainActivity : AppCompatActivity() {

    override fun onCreate(savedInstanceState: Bundle?) {
        super.onCreate(savedInstanceState)
        setContentView(R.layout.activity_main)

        //a layout
        val aLayout = findViewById<LinearLayout>(R.id.linearLayout)

        //create listview
        val aListView = ListView(this)

        //add the listview to the layout
        aLayout.addView(aListView)
    }
}
package com.androidchunk.hellolistview;

import android.os.Bundle;
import android.widget.LinearLayout;
import android.widget.ListView;

import androidx.annotation.Nullable;
import androidx.appcompat.app.AppCompatActivity;

public class MainActivity extends AppCompatActivity {

    @Override
    protected void onCreate(@Nullable Bundle savedInstanceState) {
        super.onCreate(savedInstanceState);
        setContentView(R.layout.activity_main);

        //a layout
        LinearLayout aLayout= findViewById(R.id.linearLayout;

        //create listview
        ListView aListView = new ListView(this);

        //add the listview to the layout
        aLayout.addView(aListView);
    }
}
Now we have created/Added a blank ListView. What about listView items? Where is the Implementation? We will cover it in the following examples.
5. Android ListView Attributes
| Attribute | Description |
|---|---|
| android:divider | It is the drawable resource or color that is drawn between list items. |
| android:dividerHeight | Height of the list divider |
| android:entries | An array resource that will populate the ListView |
| android:headerDividersEnabled | If we set the value to false, the ListView will not draw the divider after each header view. The default value is true. |
| android:footerDividersEnabled | If we set the value to false, the ListView will not draw the divider before each footer view. The default value is true. |
| android:listSelector | It is used to beautify the listView. It indicates currently selected item in the listView. |
6. Android ListView Examples
6.1 Simple Android ListView with ArrayAdapter Example
In this example we will create a simple Android ListView using ArrayAdapter.
Step 6.1.1: Create New Project
Create a new project in Android Studio from File ⇒ New Project and select Empty Activity from the templates.
Step 6.1.2: Add ListView to the XML Layout (UI)
Open the xml layout file and add a ListView from the palette. See the code below.
<?xml version="1.0" encoding="utf-8"?>
<RelativeLayout xmlns:android="http://schemas.android.com/apk/res/android"
    xmlns:tools="http://schemas.android.com/tools"
    android:layout_width="match_parent"
    android:layout_height="match_parent"
    tools:context=".MainActivity">

    <TextView
        android:layout_width="wrap_content"
        android:layout_height="wrap_content"
        android:layout_alignParentEnd="true"
        android:alpha="0.3"
        android:text="Hello Androidchunk!" />

    <ListView
        android:id="@+id/myListView"
        android:layout_width="match_parent"
        android:layout_height="wrap_content" />

</RelativeLayout>
Step 6.1.3: Update Activity File
Open the activity file and create an instance of ListView. Create an instance of arrayAdapter and set it to the listView.
package com.androidchunk.hellolistview;

import android.os.Bundle;
import android.view.View;
import android.widget.AdapterView;
import android.widget.ArrayAdapter;
import android.widget.ListView;
import android.widget.Toast;

import androidx.annotation.Nullable;
import androidx.appcompat.app.AppCompatActivity;

public class MainActivity extends AppCompatActivity {
    //data
    private String[] countries = new String[]
            {"Switzerland", "Canada", "India", "United States", "Germany",
                    "Sweden", "Japan", "Australia", "United Kingdom", "New Zealand", "Sweden",
                    "China", "France", "Brazil", "Russia", "Spain", "United Arab Emirates"};

    @Override
    protected void onCreate(@Nullable Bundle savedInstanceState) {
        super.onCreate(savedInstanceState);
        setContentView(R.layout.activity_main);

        //Array adapter
        ArrayAdapter<String> arrayAdapter = new ArrayAdapter<String>(this, android.R.layout.simple_list_item_1, countries);

        //instance of listview
        ListView aListView = findViewById(R.id.myListView);

        //set the arrayAdapter to the listView
        aListView.setAdapter(arrayAdapter);

        //ListView click listener
        aListView.setOnItemClickListener(new AdapterView.OnItemClickListener() {
            @Override
            public void onItemClick(AdapterView<?> adapterView, View view, int position, long id) {
                Toast.makeText(MainActivity.this, countries[position], Toast.LENGTH_SHORT).show();
            }
        });
    }
}
package com.androidchunk.hellolistview

import android.os.Bundle
import android.widget.AdapterView.OnItemClickListener
import android.widget.ArrayAdapter
import android.widget.ListView
import android.widget.Toast
import androidx.appcompat.app.AppCompatActivity

class MainActivity : AppCompatActivity() {
    //data
    private val countries = arrayOf(
        "Switzerland", "Canada", "India", "United States", "Germany",
        "Sweden", "Japan", "Australia", "United Kingdom", "New Zealand", "Sweden",
        "China", "France", "Brazil", "Russia", "Spain", "United Arab Emirates"
    )

    override fun onCreate(savedInstanceState: Bundle?) {
        super.onCreate(savedInstanceState)
        setContentView(R.layout.activity_main)

        //Array adapter
        val arrayAdapter = ArrayAdapter(this, android.R.layout.simple_list_item_1, countries)

        //instance of listview
        val aListView = findViewById<ListView>(R.id.myListView)

        //set the arrayAdapter to the listView
        aListView.adapter = arrayAdapter

        //ListView click listener
        aListView.onItemClickListener =
            OnItemClickListener { adapterView, view, position, id ->
                Toast.makeText(this@MainActivity, countries[position], Toast.LENGTH_SHORT).show()
            }
    }
}
The parameters of the ArrayAdapter constructor that we used to create an instance of ArrayAdapter are explained below.
Run the application and check the output.
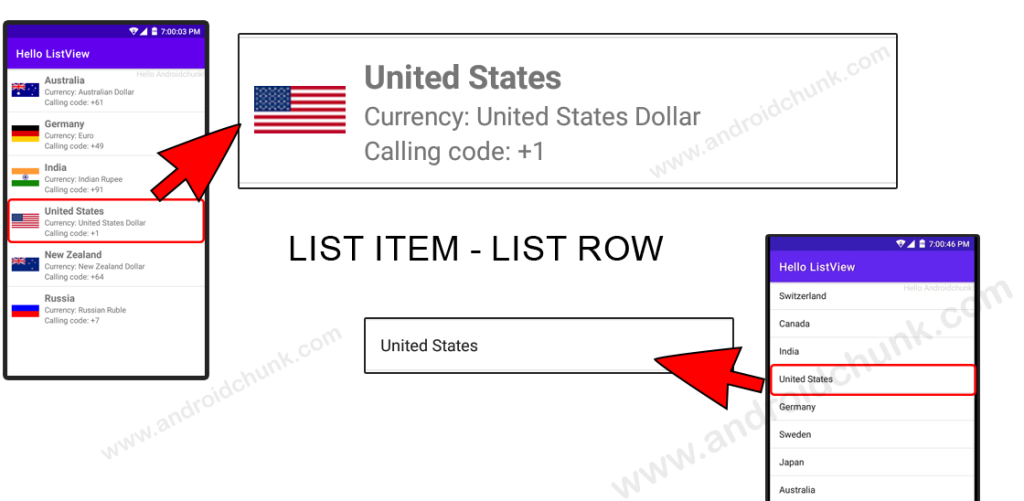
Step 6.1.4: Output
6.2 Simple Android ListView Example using BaseAdapter
In this example we will create a simple Android ListView using BaseAdapter. We will display the list of countries with their name, flag, currency etc. Let’s start.
Step 6.2.1: Create New Project
Create a new project in Android Studio from File ⇒ New Project and select Empty Activity from the templates.
Step 6.2.2: Add List Item Layout
A List Item is a unit of the ListView, So first we will create a XML layout file for the list item. See how we designed it. You can create your own too!
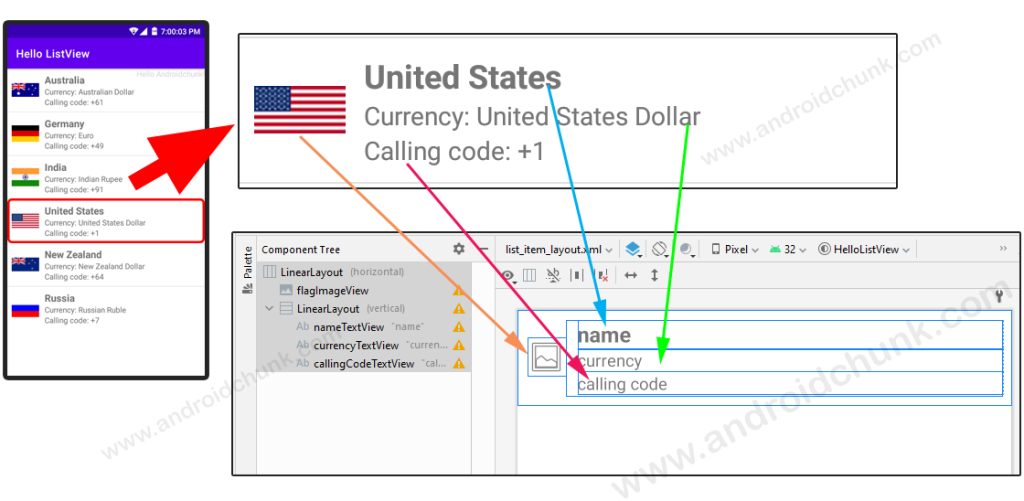
We have taken three TextViews Country name, currency, calling code respectively . We also want an ImageView to display the flag. Check the code below.
<?xml version="1.0" encoding="utf-8"?>
<LinearLayout xmlns:android="http://schemas.android.com/apk/res/android"
    android:layout_width="match_parent"
    android:layout_height="wrap_content"
    android:orientation="horizontal"
    android:padding="8dp">

    <ImageView
        android:id="@+id/flagImageView"
        android:layout_width="wrap_content"
        android:layout_height="wrap_content"
        android:layout_gravity="center_vertical"
        android:src="@mipmap/ic_launcher" />

    <LinearLayout
        android:layout_width="match_parent"
        android:layout_height="wrap_content"
        android:layout_gravity="center"
        android:orientation="vertical"
        android:paddingStart="10dp">

        <TextView
            android:id="@+id/nameTextView"
            android:layout_width="match_parent"
            android:layout_height="wrap_content"
            android:text="name"
            android:textSize="18sp"
            android:textStyle="bold" />

        <TextView
            android:id="@+id/currencyTextView"
            android:layout_width="match_parent"
            android:layout_height="wrap_content"
            android:text="currency" />

        <TextView
            android:id="@+id/callingCodeTextView"
            android:layout_width="match_parent"
            android:layout_height="wrap_content"
            android:text="calling code" />
    </LinearLayout>
</LinearLayout>
Step 6.2.3: Copy Image Resources (optional)
Now download the following images and add them to the drawable folder of the project.


Step 6.2.4: Add ListView to the XML Layout (UI)
Open the Activity’s xml layout file and add a ListView from the palette.
<?xml version="1.0" encoding="utf-8"?>
<RelativeLayout xmlns:android="http://schemas.android.com/apk/res/android"
    xmlns:tools="http://schemas.android.com/tools"
    android:layout_width="match_parent"
    android:layout_height="match_parent"
    tools:context=".MainActivity">

    <TextView
        android:layout_width="wrap_content"
        android:layout_height="wrap_content"
        android:layout_alignParentEnd="true"
        android:alpha="0.3"
        android:text="Hello Androidchunk!" />

    <ListView
        android:id="@+id/myListView"
        android:layout_width="match_parent"
        android:layout_height="wrap_content"
        tools:listitem="@layout/list_item_layout" />

</RelativeLayout>
Step 6.2.5: Create a Model Class
To display data in the ListView we have created a simple model class that helps in setting and getting country data. Model class make it easy to manage data. Let’s create one.
Open the project tool window by clicking on the project option from the Tool window bar. After that select the Android option from the drop-down and open the app → java hierarchy.
Right click on the package name and select New → Kotlin or Java class.
package com.androidchunk.hellolistview

data class Country(val name: String, val flag: Int, val currency: String, val callingCode: String)
package com.androidchunk.hellolistview;

class Country {
   private String name;
   private int flag;
   private String currency;
   private String callingCode;

   public Country(String name, int flag, String currency, String callingCode) {
      this.name = name;
      this.flag = flag;
      this.currency = currency;
      this.callingCode = callingCode;
   }
   public String getName() {
      return name;
   }
   public void setName(String name) {
      this.name = name;
   }
   public int getFlag() {
      return flag;
   }
   public void setFlag(int flag) {
      this.flag = flag;
   }
   public String getCurrency() {
      return currency;
   }
   public void setCurrency(String currency) {
      this.currency = currency;
   }
   public String getCallingCode() {
      return callingCode;
   }
   public void setCallingCode(String callingCode) {
      this.callingCode = callingCode;
   }
}
Step 6.2.6: Create a Custom Adapter Class
We learned above that the Android Adapter is the bridge between the views (e.g. ListView, GridView) and data. Let’s create one.
Right click on the package name and select New → Kotlin or Java class.
Add the following code.
package com.androidchunk.hellolistview

import android.content.Context
import android.view.LayoutInflater
import android.view.View
import android.view.ViewGroup
import android.widget.BaseAdapter
import android.widget.ImageView
import android.widget.TextView

class MyBaseAdapter(val context: Context, val data: ArrayList<Country>?) : BaseAdapter() {

    override fun getCount(): Int {
        return data?.size ?: 0
    }

    override fun getItem(position: Int): Any? {
        if (data != null)
            return data[position]
        else
            return null
    }

    override fun getItemId(position: Int): Long {
        return position.toLong()
    }

    override fun getView(position: Int, convertView: View?, viewGroup: ViewGroup?): View? {
        var view = convertView
        val holder: MyViewHolder
        if (view == null) {
            view = LayoutInflater.from(context).inflate(R.layout.list_item_layout, null, false)

            holder = MyViewHolder()

            holder.flagIV = view.findViewById(R.id.flagImageView)
            holder.nameTV = view.findViewById(R.id.nameTextView)
            holder.currencyTV = view.findViewById(R.id.currencyTextView)
            holder.callingCodeTV = view.findViewById(R.id.callingCodeTextView)

            view.tag = holder
        } else {
            holder = view.tag as MyViewHolder
        }
        holder.flagIV!!.setImageResource(data!![position].flag)

        holder.nameTV!!.text = data[position].name

        val currencyStr = "Currency: " + data[position].currency
        holder.currencyTV!!.text = currencyStr

        val callingCodeStr = "Calling code: " + data[position].callingCode
        holder.callingCodeTV!!.text = callingCodeStr

        return view
    }

    private class MyViewHolder {
        var flagIV: ImageView? = null
        var nameTV: TextView? = null
        var currencyTV: TextView? = null
        var callingCodeTV: TextView? = null
    }
}
package com.androidchunk.hellolistview;

import android.content.Context;
import android.view.LayoutInflater;
import android.view.View;
import android.view.ViewGroup;
import android.widget.BaseAdapter;
import android.widget.ImageView;
import android.widget.TextView;

import java.util.ArrayList;

class MyBaseAdapter extends BaseAdapter {
    private final Context context;
    private final ArrayList<Country> data;

    public MyBaseAdapter(Context context, ArrayList<Country> countryData) {
        this.context = context;
        this.data = countryData;
    }

    @Override
    public int getCount() {
        if (data != null) {
            return data.size();
        }
        return 0;
    }

    @Override
    public Object getItem(int position) {
        if (data != null) {
            return data.get(position);
        }
        return null;
    }

    @Override
    public long getItemId(int position) {
        return position;
    }

    @Override
    public View getView(int position, View convertView, ViewGroup viewGroup) {
        MyViewHolder holder;
        if (convertView == null) {
            convertView = LayoutInflater.from(context).inflate(R.layout.list_item_layout, null, false);

            holder = new MyViewHolder();

            holder.flagIV = convertView.findViewById(R.id.flagImageView);
            holder.nameTV = convertView.findViewById(R.id.nameTextView);
            holder.currencyTV = convertView.findViewById(R.id.currencyTextView);
            holder.callingCodeTV = convertView.findViewById(R.id.callingCodeTextView);

            convertView.setTag(holder);
        } else {
            holder = (MyViewHolder) convertView.getTag();
        }

        holder.flagIV.setImageResource(data.get(position).getFlag());

        holder.nameTV.setText(data.get(position).getName());

        String currencyStr = "Currency: " + data.get(position).getCurrency();
        holder.currencyTV.setText(currencyStr);

        String callingCodeStr = "Calling code: " + data.get(position).getCallingCode();
        holder.callingCodeTV.setText(callingCodeStr);

        return convertView;
    }

    private static class MyViewHolder {
        ImageView flagIV;
        TextView nameTV;
        TextView currencyTV;
        TextView callingCodeTV;
    }
}
Step 6.2.7: Update Activity File
Open the Activity Kotlin/Java file and modify it as follows.
package com.androidchunk.hellolistview

import android.os.Bundle
import android.widget.AdapterView.OnItemClickListener
import android.widget.ListView
import android.widget.Toast
import androidx.appcompat.app.AppCompatActivity

class MainActivity : AppCompatActivity() {
    override fun onCreate(savedInstanceState: Bundle?) {
        super.onCreate(savedInstanceState)
        setContentView(R.layout.activity_main)

        //create a list
        val countryData = ArrayList<Country>()
        //add data to the list
        countryData.add(Country("Australia", R.drawable.au, "Australian Dollar", "+61"))
        countryData.add(Country("Germany", R.drawable.de, "Euro", "+49"))
        countryData.add(Country("India", R.drawable.`in`, "Indian Rupee", "+91"))
        countryData.add(Country("United States", R.drawable.us, "United States Dollar", "+1"))
        countryData.add(Country("New Zealand", R.drawable.nz, "New Zealand Dollar", "+64"))
        countryData.add(Country("Russia", R.drawable.ru, "Russian Ruble", "+7"))

        //instance of custom adapter
        val arrayAdapter = MyBaseAdapter(this, countryData)

        //instance of listview
        val aListView = findViewById<ListView>(R.id.myListView)

        //set the adapter to the listView
        aListView.adapter = arrayAdapter

        //ListView click listener
        aListView.onItemClickListener =
            OnItemClickListener { adapterView, view, position, id ->
                val obj = aListView.getItemAtPosition(position)
                if (obj != null) {
                    val (name) = obj as Country
                    Toast.makeText(this@MainActivity, name, Toast.LENGTH_SHORT).show()
                }
            }
    }
}
package com.androidchunk.hellolistview;

import android.os.Bundle;
import android.view.View;
import android.widget.AdapterView;
import android.widget.ArrayAdapter;
import android.widget.BaseAdapter;
import android.widget.ListView;
import android.widget.Toast;

import androidx.annotation.Nullable;
import androidx.appcompat.app.AppCompatActivity;

import java.util.ArrayList;
import java.util.List;

public class MainActivity extends AppCompatActivity {
    @Override
    protected void onCreate(@Nullable Bundle savedInstanceState) {
        super.onCreate(savedInstanceState);
        setContentView(R.layout.activity_main);

        //create a list
        ArrayList<Country> countryData = new ArrayList<>();
        //add data to the list
        countryData.add(new Country("Australia", R.drawable.au, "Australian Dollar", "+61"));
        countryData.add(new Country("Germany", R.drawable.de, "Euro", "+49"));
        countryData.add(new Country("India", R.drawable.in, "Indian Rupee", "+91"));
        countryData.add(new Country("United States", R.drawable.us, "United States Dollar", "+1"));
        countryData.add(new Country("New Zealand", R.drawable.nz, "New Zealand Dollar", "+64"));
        countryData.add(new Country("Russia", R.drawable.ru, "Russian Ruble", "+7"));

        //instance of custom adapter
        MyBaseAdapter arrayAdapter = new MyBaseAdapter(this, countryData);

        //instance of listview
        ListView aListView = findViewById(R.id.myListView);

        //set the adapter to the listView
        aListView.setAdapter(arrayAdapter);

        //ListView click listener
        aListView.setOnItemClickListener(new AdapterView.OnItemClickListener() {
            @Override
            public void onItemClick(AdapterView<?> adapterView, View view, int position, long id) {
                Object obj = aListView.getItemAtPosition(position);
                if (obj != null) {
                    Country country = (Country) obj;
                    Toast.makeText(MainActivity.this, country.getName(), Toast.LENGTH_SHORT).show();
                }
            }
        });
    }
}
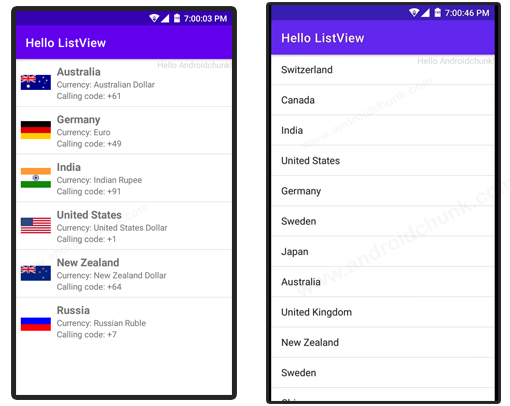
Step 6.2.8: Output
7. Exercises Box
7.1 Exercise-1
In the above example (Simple Android ListView Example Using BaseAdapter) update the adapter code with the following code, run the application and check the output.
class MyBaseAdapter(val context: Context, val data: ArrayList<Country>?) : BaseAdapter() {

    ...
    ...
    ...

    override fun getView(position: Int, convertView: View?, viewGroup: ViewGroup?): View? {
        var view = convertView
        val holder: MyViewHolder
        if (view == null) {
            view = LayoutInflater.from(context).inflate(R.layout.list_item_layout, null, false)

            holder = MyViewHolder()

            holder.flagIV = view.findViewById(R.id.flagImageView)
            holder.nameTV = view.findViewById(R.id.nameTextView)
            holder.currencyTV = view.findViewById(R.id.currencyTextView)
            holder.callingCodeTV = view.findViewById(R.id.callingCodeTextView)

            view.tag = holder
        } else {
            holder = view.tag as MyViewHolder
        }
        holder.flagIV!!.setImageResource(data!![position].flag)

        holder.nameTV!!.text = data[position].name

        val str = SpannableStringBuilder("Currency: " + data[position].currency)
        str.setSpan(StyleSpan(Typeface.BOLD),0, "Currency: ".length, Spannable.SPAN_EXCLUSIVE_EXCLUSIVE)
        //String currencyStr = "Currency: " + data.get(position).getCurrency();
        holder.currencyTV!!.text = str

        val callingCodeStr = SpannableStringBuilder("Calling code: " + data[position].callingCode)
        callingCodeStr.setSpan(StyleSpan(Typeface.BOLD),0, "Calling code: ".length, Spannable.SPAN_EXCLUSIVE_EXCLUSIVE)
        //String callingCodeStr = "Calling code: " + data.get(position).getCallingCode();
        holder.callingCodeTV!!.text = callingCodeStr

        return view
    }

    private class MyViewHolder {
        var flagIV: ImageView? = null
        var nameTV: TextView? = null
        var currencyTV: TextView? = null
        var callingCodeTV: TextView? = null
    }
}
class MyBaseAdapter extends BaseAdapter {
    ...
    ...
    ...

    @Override
    public View getView(int position, View convertView, ViewGroup viewGroup) {
        MyViewHolder holder;
        if (convertView == null) {
            convertView = LayoutInflater.from(context).inflate(R.layout.list_item_layout, null, false);

            holder = new MyViewHolder();

            holder.flagIV = convertView.findViewById(R.id.flagImageView);
            holder.nameTV = convertView.findViewById(R.id.nameTextView);
            holder.currencyTV = convertView.findViewById(R.id.currencyTextView);
            holder.callingCodeTV = convertView.findViewById(R.id.callingCodeTextView);

            convertView.setTag(holder);
        } else {
            holder = (MyViewHolder) convertView.getTag();
        }

        holder.flagIV.setImageResource(data.get(position).getFlag());

        holder.nameTV.setText(data.get(position).getName());

        SpannableStringBuilder currencyStr = new SpannableStringBuilder("Currency: " + data.get(position).getCurrency());
        currencyStr.setSpan(new android.text.style.StyleSpan(android.graphics.Typeface.BOLD), 0, "Currency: ".length(), Spannable.SPAN_EXCLUSIVE_EXCLUSIVE);
        //String currencyStr = "Currency: " + data.get(position).getCurrency();
        holder.currencyTV.setText(currencyStr);

        SpannableStringBuilder callingCodeStr = new SpannableStringBuilder("Calling code: " + data.get(position).getCallingCode());
        callingCodeStr.setSpan(new android.text.style.StyleSpan(android.graphics.Typeface.BOLD), 0, "Calling code: ".length(), Spannable.SPAN_EXCLUSIVE_EXCLUSIVE);
        //String callingCodeStr = "Calling code: " + data.get(position).getCallingCode();
        holder.callingCodeTV.setText(callingCodeStr);

        return convertView;
    }

    private static class MyViewHolder {
        ImageView flagIV;
        TextView nameTV;
        TextView currencyTV;
        TextView callingCodeTV;
    }
}
Finally we learned something about Android ListView. Hope it will be useful for you when you need to use it in your app.
Happy coding!