12th October, 2022
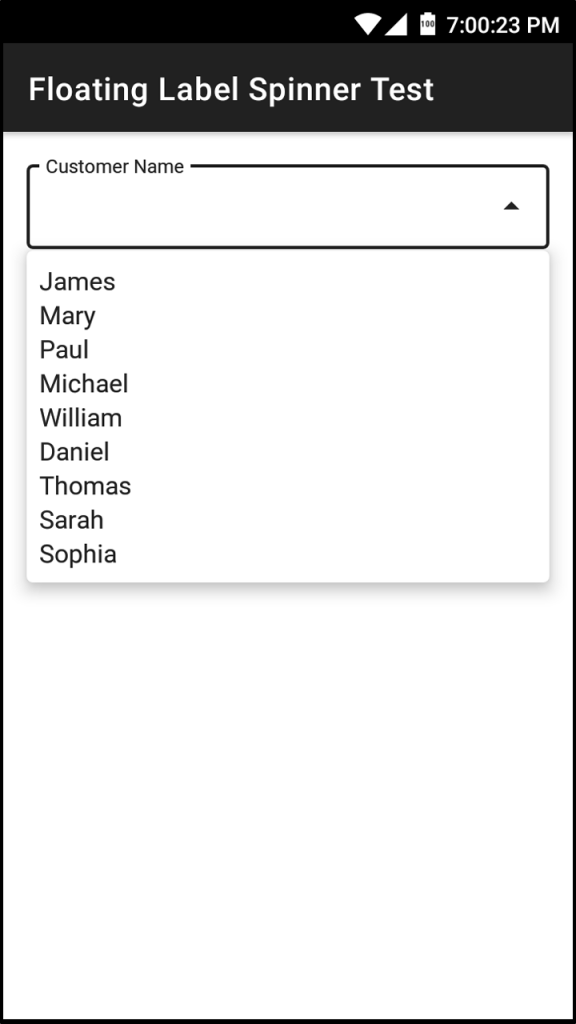
Howdy Android developer! This article shows you how to create Floating label spinner drop-down using Material Design AutocompleteTexView in Android.
Step 1: Create New Project
Create a new project in Android Studio from File ⇒ New Project and select Empty Activity from the templates.
Step 2: Update dependency
Add or update Material design dependency to the latest version.
Project ⇒ app ⇒ build.gradle
dependencies
{
    implementation 'com.google.android.material:material:1.2.1'
}
Step 3: Add Material Design theme in the AndroidManifest
We have to use Material Design theme to display Floating label material design spinner drop-down. Open AndroidManifest.xml file and add Material design theme.
<?xml version="1.0" encoding="utf-8"?>
<manifest xmlns:android="http://schemas.android.com/apk/res/android"
    package="com.codestringz.floatinglabelspinnertest">

    <application
        android:allowBackup="true"
        android:icon="@mipmap/ic_launcher"
        android:label="@string/app_name"
        android:roundIcon="@mipmap/ic_launcher_round"
        android:supportsRtl="true"
        android:theme="@style/AppTheme">
        <activity android:name=".MainActivity"
            android:theme="@style/Theme.MaterialComponents.Light.DarkActionBar">
            <intent-filter>
                <action android:name="android.intent.action.MAIN" />

                <category android:name="android.intent.category.LAUNCHER" />
            </intent-filter>
        </activity>
    </application>

</manifest>
Step 4: Create Floating Label Material Spinner dropdown
Add Floating Label Material Spinner drop-down to the XML Layout.
<?xml version="1.0" encoding="utf-8"?>
<LinearLayout xmlns:android="http://schemas.android.com/apk/res/android"
    android:orientation="vertical"
    xmlns:tools="http://schemas.android.com/tools"
    android:layout_width="match_parent"
    android:layout_height="match_parent"
    android:padding="15dp"
    tools:context=".MainActivity">

    <com.google.android.material.textfield.TextInputLayout
        android:id="@+id/customerSpinnerLayout"
        style="@style/Widget.MaterialComponents.TextInputLayout.OutlinedBox.ExposedDropdownMenu"
        android:layout_width="match_parent"
        android:layout_height="wrap_content"
        android:hint="Customer Name">

        <androidx.appcompat.widget.AppCompatAutoCompleteTextView
            android:id="@+id/customerTextView"
            android:layout_width="match_parent"
            android:layout_height="wrap_content"
            android:clickable="true"
            tools:ignore="KeyboardInaccessibleWidget" />
    </com.google.android.material.textfield.TextInputLayout>

    <com.google.android.material.button.MaterialButton
        android:id="@+id/submitButton"
        android:layout_width="match_parent"
        android:layout_height="wrap_content"
        android:layout_gravity="center"
        android:backgroundTint="#009688"
        android:layout_marginTop="15sp"
        android:text="Submit" />

</LinearLayout>
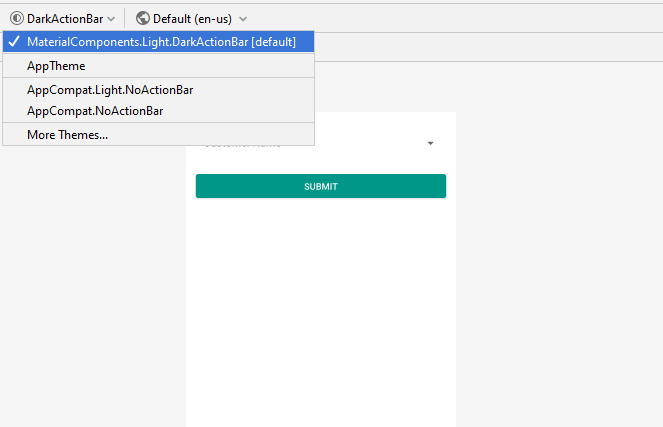
If Android Studio does not show layout preview properly, Select material theme from the top tool panel.

Next, Open the Activity and bind data to the Floating Label Material Spinner drop-down.
package com.codestringz.floatinglabelspinnertest;

import androidx.appcompat.app.AppCompatActivity;

import android.os.Bundle;
import android.view.View;
import android.widget.ArrayAdapter;
import android.widget.AutoCompleteTextView;
import android.widget.Toast;

import java.util.ArrayList;

public class MainActivity extends AppCompatActivity
{
    @Override
    protected void onCreate(Bundle savedInstanceState)
    {
        super.onCreate(savedInstanceState);
        setContentView(R.layout.activity_main);
        initUI();
    }

    private void initUI()
    {
        //UI reference of textView
        final AutoCompleteTextView customerAutoTV = findViewById(R.id.customerTextView);

        // create list of customer
        ArrayList<String> customerList = getCustomerList();

        //Create adapter
        ArrayAdapter<String> adapter = new ArrayAdapter<>(MainActivity.this, android.R.layout.simple_spinner_item, customerList);

        //Set adapter
        customerAutoTV.setAdapter(adapter);

        //submit button click event registration
        findViewById(R.id.submitButton).setOnClickListener(new View.OnClickListener()
        {
            @Override
            public void onClick(View view)
            {
                Toast.makeText(MainActivity.this, customerAutoTV.getText(), Toast.LENGTH_SHORT).show();
            }
        });
    }

    private ArrayList<String> getCustomerList()
    {
        ArrayList<String> customers = new ArrayList<>();
        customers.add("James");
        customers.add("Mary");
        customers.add("Paul");
        customers.add("Michael");
        customers.add("William");
        customers.add("Daniel");
        customers.add("Thomas");
        customers.add("Sarah");
        customers.add("Sophia");
        return customers;
    }
}

Happy coding!
