12th October, 2022
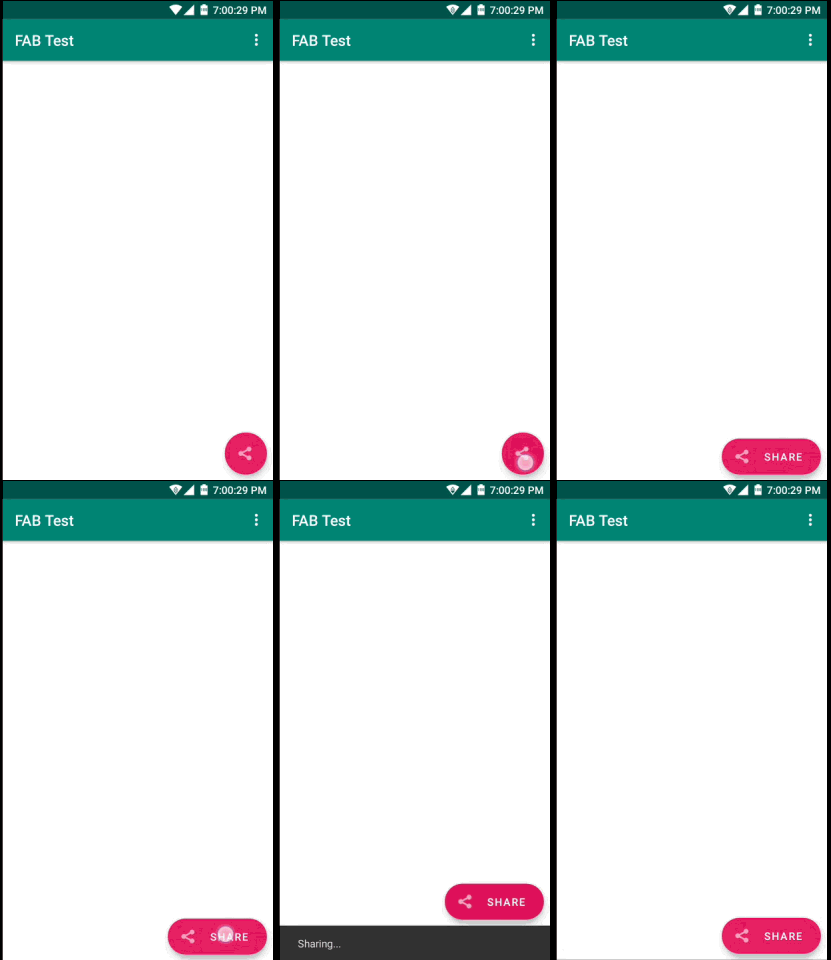
Android Floating Action Button is an interesting component introduced by Android Material Design. It attract the user’s attention. In this part you will learn how to create Simple and Extended Android Floating Action Button.
Step 1: Create New Project
Create a new project in Android Studio from File ⇒ New Project and select Basic Activity from the templates.
Step 2: Update dependency
Update Material design dependency to the latest version.
Project ⇒ app ⇒ build.gradle
dependencies
{
    implementation 'com.google.android.material:material:1.1.0-alpha10'
}
Step 3: Create Floating Action Button
Create Simple FloatingActionButton
Add FloatingActionButton to the XML Layout.
<?xml version="1.0" encoding="utf-8"?>
<androidx.coordinatorlayout.widget.CoordinatorLayout
    xmlns:android="http://schemas.android.com/apk/res/android"
    xmlns:app="http://schemas.android.com/apk/res-auto"
    xmlns:tools="http://schemas.android.com/tools"
    android:layout_width="match_parent"
    android:layout_height="match_parent"
    tools:context=".MainActivity">

    <com.google.android.material.appbar.AppBarLayout
        android:layout_width="match_parent"
        android:layout_height="wrap_content"
        android:theme="@style/AppTheme.AppBarOverlay">

        <androidx.appcompat.widget.Toolbar
            android:id="@+id/toolbar"
            android:layout_width="match_parent"
            android:layout_height="?attr/actionBarSize"
            android:background="?attr/colorPrimary"
            app:popupTheme="@style/AppTheme.PopupOverlay" />

    </com.google.android.material.appbar.AppBarLayout>

    <!--Main content-->

    <com.google.android.material.floatingactionbutton.FloatingActionButton
        android:id="@+id/fab"
        android:layout_width="wrap_content"
        android:layout_height="wrap_content"
        android:layout_gravity="bottom|end"
        android:layout_margin="@dimen/fab_margin"
        app:srcCompat="@android:drawable/ic_dialog_email" />

</androidx.coordinatorlayout.widget.CoordinatorLayout>
Add click listener for the FloatingActionButton.
package com.codestringz.fabtest;

import android.os.Bundle;

import com.google.android.material.floatingactionbutton.FloatingActionButton;
import com.google.android.material.snackbar.Snackbar;

import androidx.appcompat.app.AppCompatActivity;
import androidx.appcompat.widget.Toolbar;

import android.view.View;
import android.view.Menu;
import android.view.MenuItem;

public class MainActivity extends AppCompatActivity
{

    @Override
    protected void onCreate(Bundle savedInstanceState)
    {
        super.onCreate(savedInstanceState);
        setContentView(R.layout.activity_main);
        Toolbar toolbar = findViewById(R.id.toolbar);
        setSupportActionBar(toolbar);

        FloatingActionButton fab = findViewById(R.id.fab);
        fab.setOnClickListener(new View.OnClickListener()
        {
            @Override
            public void onClick(View view)
            {
                Snackbar.make(view, "Replace with your own action", Snackbar.LENGTH_LONG).show();
            }
        });
    }

    @Override
    public boolean onCreateOptionsMenu(Menu menu)
    {
        // Inflate the menu; this adds items to the action bar if it is present.
        getMenuInflater().inflate(R.menu.menu_main, menu);
        return true;
    }

    @Override
    public boolean onOptionsItemSelected(MenuItem item)
    {
        // Handle action bar item clicks here. The action bar will
        // automatically handle clicks on the Home/Up button, so long
        // as you specify a parent activity in AndroidManifest.xml.
        int id = item.getItemId();

        //noinspection SimplifiableIfStatement
        if (id == R.id.action_settings)
        {
            return true;
        }

        return super.onOptionsItemSelected(item);
    }
}
Project ⇒ app ⇒ src ⇒ main ⇒ res ⇒ values ⇒ dimens.xml
<resources>
    <dimen name="fab_margin">16dp</dimen>
</resources>
Project ⇒ app ⇒ src ⇒ main ⇒ res ⇒ values ⇒ styles.xml
<resources>

    <!-- Base application theme. -->
    <style name="AppTheme" parent="Theme.AppCompat.Light.DarkActionBar">
        <!-- Customize your theme here. -->
        <item name="colorPrimary">@color/colorPrimary</item>
        <item name="colorPrimaryDark">@color/colorPrimaryDark</item>
        <item name="colorAccent">@color/colorAccent</item>
    </style>

    <style name="AppTheme.NoActionBar">
        <item name="windowActionBar">false</item>
        <item name="windowNoTitle">true</item>
    </style>

    <style name="AppTheme.AppBarOverlay" parent="ThemeOverlay.AppCompat.Dark.ActionBar" />

    <style name="AppTheme.PopupOverlay" parent="ThemeOverlay.AppCompat.Light" />

</resources>

Create Simple ExtendedFloatingActionButton
Add ExtendedFloatingActionButton to the XML Layout.
<?xml version="1.0" encoding="utf-8"?>
<androidx.coordinatorlayout.widget.CoordinatorLayout
    xmlns:android="http://schemas.android.com/apk/res/android"
    xmlns:app="http://schemas.android.com/apk/res-auto"
    xmlns:tools="http://schemas.android.com/tools"
    android:layout_width="match_parent"
    android:layout_height="match_parent"
    tools:context=".MainActivity">

    <com.google.android.material.appbar.AppBarLayout
        android:layout_width="match_parent"
        android:layout_height="wrap_content"
        android:theme="@style/AppTheme.AppBarOverlay">

        <androidx.appcompat.widget.Toolbar
            android:id="@+id/toolbar"
            android:layout_width="match_parent"
            android:layout_height="?attr/actionBarSize"
            android:background="?attr/colorPrimary"
            app:popupTheme="@style/AppTheme.PopupOverlay" />

    </com.google.android.material.appbar.AppBarLayout>

    <!--Main content-->

    <com.google.android.material.floatingactionbutton.ExtendedFloatingActionButton
        android:id="@+id/extFab"
        android:layout_width="wrap_content"
        android:layout_height="wrap_content"
        android:layout_margin="8dp"
        android:theme="@style/Theme.MaterialComponents"
        android:text="Share"
        android:textColor="@android:color/white"
        app:backgroundTint="#E91E63"
        app:rippleColor="#7C1031"
        app:iconTint="@android:color/white"
        app:icon="@android:drawable/ic_menu_share"
        android:layout_alignParentBottom="true"
        android:layout_gravity="bottom|end|right"/>

</androidx.coordinatorlayout.widget.CoordinatorLayout>
Next, Open the Activity and add the click listener to the Extended Floating Action Button.
package com.codestringz.fabtest;

import android.os.Bundle;

import com.google.android.material.floatingactionbutton.ExtendedFloatingActionButton;
import com.google.android.material.snackbar.Snackbar;

import androidx.appcompat.app.AppCompatActivity;
import androidx.appcompat.widget.Toolbar;

import android.view.View;
import android.view.Menu;
import android.view.MenuItem;

public class MainActivity extends AppCompatActivity
{

    private ExtendedFloatingActionButton mShareExtFAB;

    @Override
    protected void onCreate(Bundle savedInstanceState)
    {
        super.onCreate(savedInstanceState);
        setContentView(R.layout.activity_main);
        Toolbar toolbar = findViewById(R.id.toolbar);
        setSupportActionBar(toolbar);

        setUIRef();
    }

    private void setUIRef()
    {

        mShareExtFAB = findViewById(R.id.extFab);
        mShareExtFAB.shrink();
        mShareExtFAB.setOnClickListener(new View.OnClickListener()
        {
            @Override
            public void onClick(View view)
            {
                if (mShareExtFAB.isExtended())
                {
                    Snackbar.make(view, "Sharing... ", Snackbar.LENGTH_SHORT).show();
                }
                else
                {
                    mShareExtFAB.extend();
                }
            }
        });
    }

    @Override
    public boolean onCreateOptionsMenu(Menu menu)
    {
        // Inflate the menu; this adds items to the action bar if it is present.
        getMenuInflater().inflate(R.menu.menu_main, menu);
        return true;
    }

    @Override
    public boolean onOptionsItemSelected(MenuItem item)
    {
        // Handle action bar item clicks here. The action bar will
        // automatically handle clicks on the Home/Up button, so long
        // as you specify a parent activity in AndroidManifest.xml.
        int id = item.getItemId();

        //noinspection SimplifiableIfStatement
        if (id == R.id.action_settings)
        {
            return true;
        }

        return super.onOptionsItemSelected(item);
    }
}

Happy coding!
