
5th February, 2023
Photo editing is a popular tool in Android apps. After learning this lesson, you will be able to create a simple photo erasing tool for your app.
Step 1: Create New Project
Create a new project in Android Studio from File ⇒ New Project and select Empty Activity from the templates.
Step 2: Create custom View
Create a custom class .
package com.codestringz.eraseimageexample;

import android.annotation.SuppressLint;
import android.content.Context;
import android.graphics.Bitmap;
import android.graphics.BitmapFactory;
import android.graphics.Canvas;
import android.graphics.Paint;
import android.graphics.Path;
import android.graphics.PorterDuff;
import android.graphics.PorterDuffXfermode;
import android.view.MotionEvent;
import android.view.View;

public class MyCustomView extends View
{
    private Bitmap mSourceBitmap;
    private Canvas mSourceCanvas = new Canvas();
    private Paint mDestPaint = new Paint();
    private Path mDestPath = new Path();

    public MyCustomView(Context context)
    {
        super(context);

        //convert drawable file into bitmap
        Bitmap rawBitmap = BitmapFactory.decodeResource(context.getResources(), R.drawable.image_cat);

        //convert bitmap into mutable bitmap
        mSourceBitmap = Bitmap.createBitmap(rawBitmap.getWidth(), rawBitmap.getHeight(), Bitmap.Config.ARGB_8888);

        mSourceCanvas.setBitmap(mSourceBitmap);
        mSourceCanvas.drawBitmap(rawBitmap, 0, 0, null);

        mDestPaint.setAlpha(0);
        mDestPaint.setAntiAlias(true);
        mDestPaint.setStyle(Paint.Style.STROKE);
        mDestPaint.setStrokeJoin(Paint.Join.ROUND);
        mDestPaint.setStrokeCap(Paint.Cap.ROUND);
        mDestPaint.setStrokeWidth(50);
        mDestPaint.setXfermode(new PorterDuffXfermode(PorterDuff.Mode.DST_IN));
    }

    @Override
    protected void onDraw(Canvas canvas)
    {
        //Draw path
        mSourceCanvas.drawPath(mDestPath, mDestPaint);

        //Draw bitmap
        canvas.drawBitmap(mSourceBitmap, 0, 0, null);

        super.onDraw(canvas);
    }

    @SuppressLint("ClickableViewAccessibility")
    @Override
    public boolean onTouchEvent(MotionEvent event)
    {
        float xPos = event.getX();
        float yPos = event.getY();

        switch (event.getAction())
        {
            case MotionEvent.ACTION_DOWN:
                mDestPath.moveTo(xPos, yPos);
                break;

            case MotionEvent.ACTION_MOVE:
                mDestPath.lineTo(xPos, yPos);
                break;

            default:
                return false;
        }

        invalidate();
        return true;
    }
}
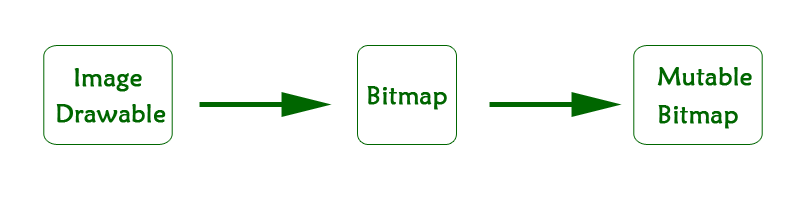
Line: 27 – 30 ⇒ Drawable Image to Erasable Bitmap
//convert drawable file into bitmap
Bitmap rawBitmap = BitmapFactory.decodeResource(context.getResources(), R.drawable.image_cat);

//convert bitmap into mutable bitmap
mSourceBitmap = Bitmap.createBitmap(rawBitmap.getWidth(), rawBitmap.getHeight(), Bitmap.Config.ARGB_8888);
To create erasable bitmap, First convert the drawable resource to a bitmap and then convert the bitmap to a mutable bitmap. Please see the picture.
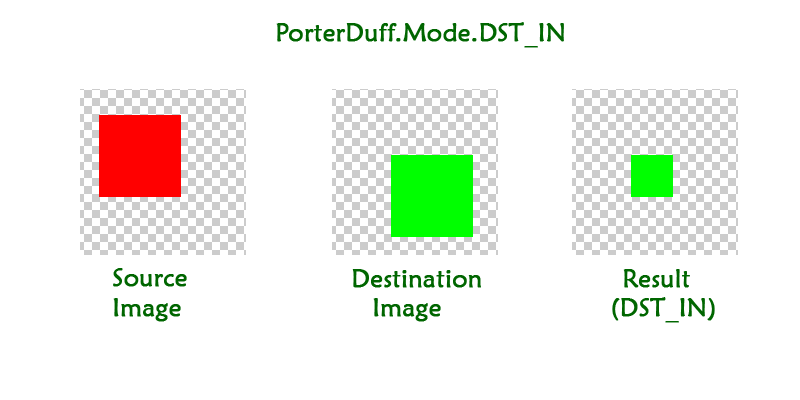
Line: 41 ⇒ Android Graphics PorterDuff.Mode.DST_IN
mDestPaint.setXfermode(new PorterDuffXfermode(PorterDuff.Mode.DST_IN));
Here PorterDuff.Mode.DST_IN Mode is used for the paint object. This mode helps to erase the bitmap. Let’s take a brief look on this. Click here to learn more about PorterDuff.Mode.
Step 3: Modify the Activity
Now open the Activity and create a object (view) from the custom class then add it into the root layout.
package com.codestringz.eraseimageexample;

import androidx.appcompat.app.AppCompatActivity;

import android.os.Bundle;
import android.widget.RelativeLayout;

public class MainActivity extends AppCompatActivity
{

    @Override
    protected void onCreate(Bundle savedInstanceState)
    {
        super.onCreate(savedInstanceState);
        setContentView(R.layout.activity_main);

        //Create a object of custom view
        MyCustomView myCustomView = new MyCustomView(MainActivity.this);

        //Get root layout of the activity
        RelativeLayout rootLayout = findViewById(R.id.activity_main);

        //Add custom view into root layout
        rootLayout.addView(myCustomView);
    }
}
<?xml version="1.0" encoding="utf-8"?>
<RelativeLayout xmlns:android="http://schemas.android.com/apk/res/android"
    xmlns:tools="http://schemas.android.com/tools"
    android:id="@+id/activity_main"
    android:layout_width="match_parent"
    android:layout_height="match_parent"
    tools:context=".MainActivity">

</RelativeLayout>
Video Tutorial
Happy coding!