2nd April, 2023
Hello Android Developer! Android Navigation Drawer is a UI component that provides a user-friendly interface for accessing different parts of the app. In this part, You will see how to create Android Navigation Drawer Using Fragments.
Step 1: Create New Project
Create a new project in Android Studio from File ⇒ New Project and select Navigation Drawer Activity from the templates.
Step 2: Create Fragment
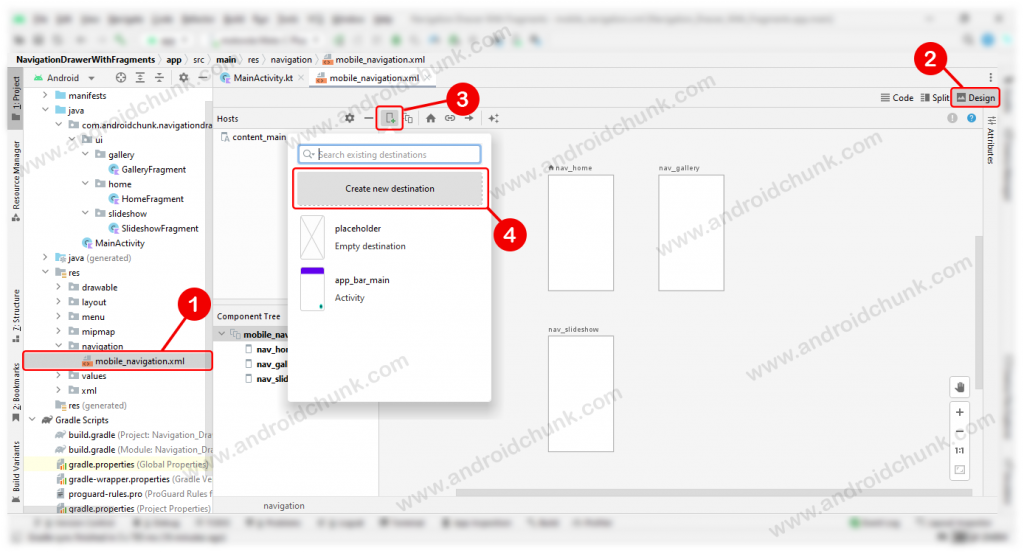
Open the mobile_navigation.xml file which is available in
app ⇒ src ⇒ main ⇒ res ⇒ navigation directory. Open the design panel and click the New Destination icon in the left top corner. Refer to the image below.
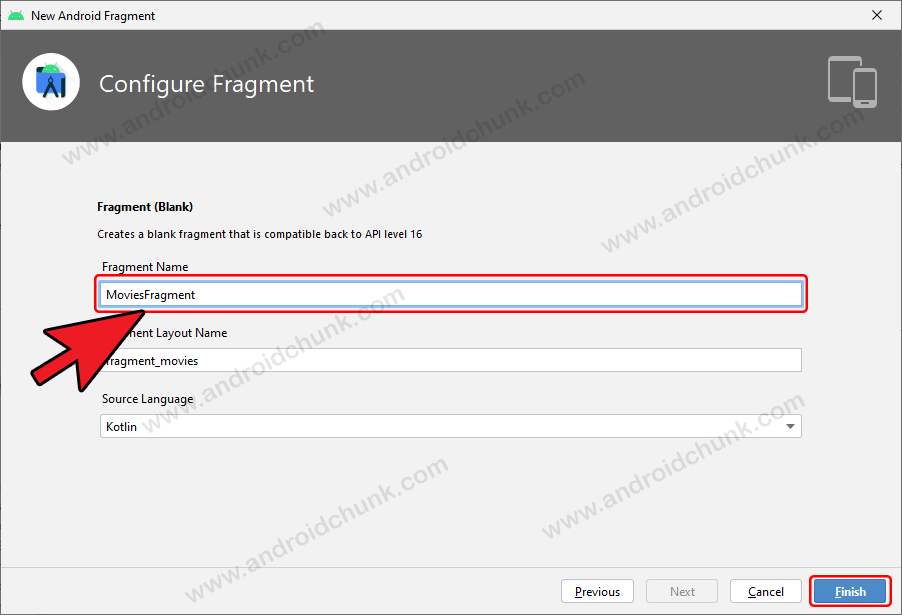
A new popup window will open. I want an empty fragment, so here I select fragment (Blank) option and click the next button.

The next popup window will ask you for details about the new fragment. Fill the required details and click on finish button.
Great! New Fragment has been created successfully. Remove unnecessary variables, methods and verbose from the code.
<?xml version="1.0" encoding="utf-8"?>
<navigation xmlns:android="http://schemas.android.com/apk/res/android"
    xmlns:app="http://schemas.android.com/apk/res-auto"
    xmlns:tools="http://schemas.android.com/tools"
    android:id="@+id/mobile_navigation"
    app:startDestination="@+id/nav_home">

    <fragment
        android:id="@+id/nav_home"
        android:name="com.androidchunk.navigationdrawerwithfragments.ui.home.HomeFragment"
        android:label="@string/menu_home"
        tools:layout="@layout/fragment_home" />

    <fragment
        android:id="@+id/nav_gallery"
        android:name="com.androidchunk.navigationdrawerwithfragments.ui.gallery.GalleryFragment"
        android:label="@string/menu_gallery"
        tools:layout="@layout/fragment_gallery" />

    <fragment
        android:id="@+id/nav_slideshow"
        android:name="com.androidchunk.navigationdrawerwithfragments.ui.slideshow.SlideshowFragment"
        android:label="@string/menu_slideshow"
        tools:layout="@layout/fragment_slideshow" />
    <fragment
        android:id="@+id/nav_movies"
        android:name="com.androidchunk.navigationdrawerwithfragments.ui.movies.MoviesFragment"
        android:label="@string/menu_movies"
        tools:layout="@layout/fragment_movies" />
</navigation>
package com.androidchunk.navigationdrawerwithfragments.ui.movies

import android.os.Bundle
import android.view.LayoutInflater
import android.view.View
import android.view.ViewGroup
import androidx.fragment.app.Fragment
import com.androidchunk.navigationdrawerwithfragments.databinding.FragmentMoviesBinding

class MoviesFragment : Fragment() {

    private var _binding: FragmentMoviesBinding? = null

    private val binding get() = _binding!!

    override fun onCreateView(
        inflater: LayoutInflater,
        container: ViewGroup?,
        savedInstanceState: Bundle?
    ): View {
        _binding = FragmentMoviesBinding.inflate(inflater, container, false)
        binding.textMovies.text = "This is movies Fragment"
        return binding.root
    }

    override fun onDestroyView() {
        super.onDestroyView()
        _binding = null
    }
}
package com.androidchunk.navigationdrawerwithfragments.ui.movies;

import android.os.Bundle;
import android.view.LayoutInflater;
import android.view.View;
import android.view.ViewGroup;

import androidx.annotation.NonNull;
import androidx.annotation.Nullable;
import androidx.fragment.app.Fragment;

import com.androidchunk.navigationdrawerwithfragments.databinding.FragmentMoviesBinding;

class MoviesFragment extends Fragment {

    private FragmentMoviesBinding binding;

    @Nullable
    @Override
    public View onCreateView(@NonNull LayoutInflater inflater, @Nullable ViewGroup container, @Nullable Bundle savedInstanceState) {
        binding = FragmentMoviesBinding.inflate(inflater, container, false);
        binding.textMovies.setText("This is movies Fragment");
        return binding.getRoot();
    }

    @Override
    public void onDestroyView() {
        super.onDestroyView();
        binding = null;
    }
}
<?xml version="1.0" encoding="utf-8"?>
<RelativeLayout xmlns:android="http://schemas.android.com/apk/res/android"
    xmlns:tools="http://schemas.android.com/tools"
    android:layout_width="match_parent"
    android:layout_height="match_parent"
    tools:context=".ui.movies.MoviesFragment">

    <TextView
        android:id="@+id/text_movies"
        android:layout_width="match_parent"
        android:layout_height="wrap_content"
        android:layout_centerInParent="true"
        android:textAlignment="center"
        android:textSize="20sp" />
</RelativeLayout>
Step 4: Set Fragment in Navigation Drawer
After creating the fragment you need to add your fragment to the navigation drawer so that the user can access the fragment by selecting the navigation menu item.
Step 4.1: Add Menu Item
Open the menu file of the navigation drawer and add a menu item. This is menu file of navigation drawer. You can add or remove menu from here as per your project requirement. I have used four menu in this project.
Create/Add an icon and set it as the value of the android:icon attribute that is associated with the item.
<?xml version="1.0" encoding="utf-8"?>
<menu xmlns:android="http://schemas.android.com/apk/res/android"
    xmlns:tools="http://schemas.android.com/tools"
    tools:showIn="navigation_view">

    <group android:checkableBehavior="single">
        <item
            android:id="@+id/nav_home"
            android:icon="@drawable/ic_menu_camera"
            android:title="@string/menu_home" />
        <item
            android:id="@+id/nav_gallery"
            android:icon="@drawable/ic_menu_gallery"
            android:title="@string/menu_gallery" />
        <item
            android:id="@+id/nav_slideshow"
            android:icon="@drawable/ic_menu_slideshow"
            android:title="@string/menu_slideshow" />
        <item
            android:id="@+id/nav_movies"
            android:icon="@drawable/ic_menu_movies"
            android:title="@string/menu_movies" />
    </group>
</menu>
Step 4.2: Modify MainActivity
Open MainActivity and add id (R.id.nav_movies) to the set of AppBarConfiguration.
package com.androidchunk.navigationdrawerwithfragments

import android.os.Bundle
import android.view.Menu
import com.google.android.material.snackbar.Snackbar
import com.google.android.material.navigation.NavigationView
import androidx.navigation.findNavController
import androidx.navigation.ui.AppBarConfiguration
import androidx.navigation.ui.navigateUp
import androidx.navigation.ui.setupActionBarWithNavController
import androidx.navigation.ui.setupWithNavController
import androidx.drawerlayout.widget.DrawerLayout
import androidx.appcompat.app.AppCompatActivity
import androidx.navigation.fragment.NavHostFragment
import com.androidchunk.navigationdrawerwithfragments.databinding.ActivityMainBinding

class MainActivity : AppCompatActivity() {

    //appbar-configuration object
    private lateinit var appBarConfiguration: AppBarConfiguration
    private lateinit var binding: ActivityMainBinding

    override fun onCreate(savedInstanceState: Bundle?) {
        super.onCreate(savedInstanceState)

        //viewBinding
        binding = ActivityMainBinding.inflate(layoutInflater)
        setContentView(binding.root)

        //set actionbar
        setSupportActionBar(binding.appBarMain.toolbar)

        //fab button click event handling
        binding.appBarMain.fab.setOnClickListener { view ->
            Snackbar.make(view, "Replace with your own action", Snackbar.LENGTH_LONG)
                .setAction("Action", null).show()
        }
        val drawerLayout: DrawerLayout = binding.drawerLayout
        val navView: NavigationView = binding.navView

        // Passing each menu ID as a set of Ids because each
        // menu should be considered as top level destinations.
        appBarConfiguration = AppBarConfiguration(
            setOf(
                R.id.nav_home, R.id.nav_gallery, R.id.nav_slideshow, R.id.nav_movies
            ), drawerLayout
        )

        val navHostFragment = supportFragmentManager.findFragmentById(R.id.nav_host_fragment_content_main) as NavHostFragment
        val navController = navHostFragment.navController
        setupActionBarWithNavController(navController, appBarConfiguration)
        navView.setupWithNavController(navController)
    }

    override fun onCreateOptionsMenu(menu: Menu): Boolean {
        // Inflate the menu; this adds items to the action bar if it is present.
        menuInflater.inflate(R.menu.main, menu)
        return true
    }

    override fun onSupportNavigateUp(): Boolean {
        val navController = findNavController(R.id.nav_host_fragment_content_main)
        return navController.navigateUp(appBarConfiguration) || super.onSupportNavigateUp()
    }
}
package com.androidchunk.navigationdrawerwithfragments;

import android.os.Bundle;
import android.view.View;
import android.view.Menu;

import com.google.android.material.snackbar.Snackbar;
import com.google.android.material.navigation.NavigationView;

import androidx.annotation.Nullable;
import androidx.navigation.NavController;
import androidx.navigation.Navigation;
import androidx.navigation.fragment.NavHostFragment;
import androidx.navigation.ui.AppBarConfiguration;
import androidx.navigation.ui.NavigationUI;
import androidx.drawerlayout.widget.DrawerLayout;
import androidx.appcompat.app.AppCompatActivity;

import com.androidchunk.navigationdrawerwithfragments.databinding.ActivityMainBinding;

public class MainActivity extends AppCompatActivity {

    //appbar-configuration object
    private AppBarConfiguration appBarConfiguration;
    private ActivityMainBinding binding;

    @Override
    protected void onCreate(@Nullable Bundle savedInstanceState) {
        super.onCreate(savedInstanceState);

        //viewBinding
        binding = ActivityMainBinding.inflate(getLayoutInflater());
        setContentView(binding.getRoot());

        //set actionbar
        setSupportActionBar(binding.appBarMain.toolbar);

        //fab button click event handling
        binding.appBarMain.fab.setOnClickListener(new View.OnClickListener() {
            @Override
            public void onClick(View view) {
                Snackbar.make(view, "Replace with your own action", Snackbar.LENGTH_LONG)
                        .setAction("Action", null).show();
            }
        });

        DrawerLayout drawer = binding.drawerLayout;
        NavigationView navigationView = binding.navView;

        // Passing each menu ID as a set of Ids because each
        // menu should be considered as top level destinations.
        appBarConfiguration = new AppBarConfiguration.Builder(
                R.id.nav_home, R.id.nav_gallery, R.id.nav_slideshow, R.id.nav_movies)
                .setOpenableLayout(drawer)
                .build();

        NavHostFragment navHostFragment  =(NavHostFragment)getSupportFragmentManager().findFragmentById(R.id.nav_host_fragment_content_main) ;
        NavController navController =navHostFragment.getNavController();

        NavigationUI.setupActionBarWithNavController(this, navController, appBarConfiguration);
        NavigationUI.setupWithNavController(navigationView, navController);
    }

    @Override
    public boolean onCreateOptionsMenu(Menu menu) {
        getMenuInflater().inflate(R.menu.main, menu);
        return true;
    }

    @Override
    public boolean onSupportNavigateUp() {
        NavController navController = Navigation.findNavController(this, R.id.nav_host_fragment_content_main);
        return NavigationUI.navigateUp(navController, appBarConfiguration)
                || super.onSupportNavigateUp();
    }
}
Step 3: Code Clean up
Android studio also generated fragments with livedata. I don’t want the livedata at this point, so I am cleaning up the code. See code below for other fragments.
Home Fragment
package com.androidchunk.navigationdrawerwithfragments.ui.home

import android.os.Bundle
import android.view.LayoutInflater
import android.view.View
import android.view.ViewGroup
import androidx.fragment.app.Fragment
import com.androidchunk.navigationdrawerwithfragments.databinding.FragmentHomeBinding

class HomeFragment : Fragment() {

    private var _binding: FragmentHomeBinding? = null

    private val binding get() = _binding!!

    override fun onCreateView(
        inflater: LayoutInflater,
        container: ViewGroup?,
        savedInstanceState: Bundle?
    ): View {
        _binding = FragmentHomeBinding.inflate(inflater, container, false)
        binding.textHome.text = "This is home Fragment"
        return binding.root
    }

    override fun onDestroyView() {
        super.onDestroyView()
        _binding = null
    }
}
package com.androidchunk.navigationdrawerwithfragments.ui.home;

import android.os.Bundle;
import android.view.LayoutInflater;
import android.view.View;
import android.view.ViewGroup;

import androidx.annotation.NonNull;
import androidx.annotation.Nullable;
import androidx.fragment.app.Fragment;

import com.androidchunk.navigationdrawerwithfragments.databinding.FragmentHomeBinding;

class HomeFragment extends Fragment {

    private FragmentHomeBinding binding;

    @Nullable
    @Override
    public View onCreateView(@NonNull LayoutInflater inflater, @Nullable ViewGroup container, @Nullable Bundle savedInstanceState) {
        binding = FragmentHomeBinding.inflate(inflater, container, false);
        binding.textHome.setText("This is home Fragment");
        return binding.getRoot();
    }

    @Override
    public void onDestroyView() {
        super.onDestroyView();
        binding = null;
    }
}
<?xml version="1.0" encoding="utf-8"?>
<RelativeLayout xmlns:android="http://schemas.android.com/apk/res/android"
    xmlns:tools="http://schemas.android.com/tools"
    android:layout_width="match_parent"
    android:layout_height="match_parent"
    tools:context=".ui.home.HomeFragment">

    <TextView
        android:id="@+id/text_home"
        android:layout_width="match_parent"
        android:layout_height="wrap_content"
        android:layout_centerInParent="true"
        android:textAlignment="center"
        android:textSize="20sp" />
</RelativeLayout>
Gallery Fragment
package com.androidchunk.navigationdrawerwithfragments.ui.gallery

import android.os.Bundle
import android.view.LayoutInflater
import android.view.View
import android.view.ViewGroup
import androidx.fragment.app.Fragment
import com.androidchunk.navigationdrawerwithfragments.databinding.FragmentGalleryBinding

class GalleryFragment : Fragment() {

    private var _binding: FragmentGalleryBinding? = null

    private val binding get() = _binding!!

    override fun onCreateView(
        inflater: LayoutInflater,
        container: ViewGroup?,
        savedInstanceState: Bundle?
    ): View {
        _binding = FragmentGalleryBinding.inflate(inflater, container, false)
        binding.textGallery.text = "This is gallery Fragment"
        return binding.root
    }

    override fun onDestroyView() {
        super.onDestroyView()
        _binding = null
    }
}
package com.androidchunk.navigationdrawerwithfragments.ui.gallery;

import android.os.Bundle;
import android.view.LayoutInflater;
import android.view.View;
import android.view.ViewGroup;

import androidx.annotation.NonNull;
import androidx.annotation.Nullable;
import androidx.fragment.app.Fragment;

import com.androidchunk.navigationdrawerwithfragments.databinding.FragmentGalleryBinding;

class GalleryFragment extends Fragment {

    private FragmentGalleryBinding binding;

    @Nullable
    @Override
    public View onCreateView(@NonNull LayoutInflater inflater, @Nullable ViewGroup container, @Nullable Bundle savedInstanceState) {
        binding = FragmentGalleryBinding.inflate(inflater, container, false);
        binding.textGallery.setText("This is gallery Fragment");
        return binding.getRoot();
    }

    @Override
    public void onDestroyView() {
        super.onDestroyView();
        binding = null;
    }
}
<?xml version="1.0" encoding="utf-8"?>
<RelativeLayout xmlns:android="http://schemas.android.com/apk/res/android"
    xmlns:tools="http://schemas.android.com/tools"
    android:layout_width="match_parent"
    android:layout_height="match_parent"
    tools:context=".ui.gallery.GalleryFragment">

    <TextView
        android:id="@+id/text_gallery"
        android:layout_width="match_parent"
        android:layout_height="wrap_content"
        android:layout_centerInParent="true"
        android:textAlignment="center"
        android:textSize="20sp" />
</RelativeLayout>
Slideshow Fragment
package com.androidchunk.navigationdrawerwithfragments.ui.slideshow

import android.os.Bundle
import android.view.LayoutInflater
import android.view.View
import android.view.ViewGroup
import androidx.fragment.app.Fragment
import com.androidchunk.navigationdrawerwithfragments.databinding.FragmentSlideshowBinding

class SlideshowFragment : Fragment() {

    private var _binding: FragmentSlideshowBinding? = null

    private val binding get() = _binding!!

    override fun onCreateView(
        inflater: LayoutInflater,
        container: ViewGroup?,
        savedInstanceState: Bundle?
    ): View {
        _binding = FragmentSlideshowBinding.inflate(inflater, container, false)
        binding.textSlideshow.text = "This is slideshow Fragment"
        return binding.root
    }

    override fun onDestroyView() {
        super.onDestroyView()
        _binding = null
    }
}
package com.androidchunk.navigationdrawerwithfragments.ui.slideshow;

import android.os.Bundle;
import android.view.LayoutInflater;
import android.view.View;
import android.view.ViewGroup;

import androidx.annotation.NonNull;
import androidx.annotation.Nullable;
import androidx.fragment.app.Fragment;

import com.androidchunk.navigationdrawerwithfragments.databinding.FragmentSlideshowBinding;

class SlideshowFragment extends Fragment {

    private FragmentSlideshowBinding binding;

    @Nullable
    @Override
    public View onCreateView(@NonNull LayoutInflater inflater, @Nullable ViewGroup container, @Nullable Bundle savedInstanceState) {
        binding = FragmentSlideshowBinding.inflate(inflater, container, false);
        binding.textSlideshow.setText("This is slideshow Fragment");
        return binding.getRoot();
    }

    @Override
    public void onDestroyView() {
        super.onDestroyView();
        binding = null;
    }
}
<?xml version="1.0" encoding="utf-8"?>
<RelativeLayout xmlns:android="http://schemas.android.com/apk/res/android"
    xmlns:tools="http://schemas.android.com/tools"
    android:layout_width="match_parent"
    android:layout_height="match_parent"
    tools:context=".ui.slideshow.SlideshowFragment">

    <TextView
        android:id="@+id/text_slideshow"
        android:layout_width="match_parent"
        android:layout_height="wrap_content"
        android:layout_centerInParent="true"
        android:textAlignment="center"
        android:textSize="20sp" />
</RelativeLayout>
Module level Gradle (build.gradle)
plugins {
    id 'com.android.application'
    id 'org.jetbrains.kotlin.android'
}

android {
    namespace 'com.androidchunk.navigationdrawerwithfragments'
    compileSdk 32

    defaultConfig {
        applicationId "com.androidchunk.navigationdrawerwithfragments"
        minSdk 22
        targetSdk 32
        versionCode 1
        versionName "1.0.0"
    }

    buildTypes {
        release {
            minifyEnabled false
            proguardFiles getDefaultProguardFile('proguard-android-optimize.txt'), 'proguard-rules.pro'
        }
    }
    compileOptions {
        sourceCompatibility JavaVersion.VERSION_1_8
        targetCompatibility JavaVersion.VERSION_1_8
    }
    kotlinOptions {
        jvmTarget = '1.8'
    }
    buildFeatures {
        viewBinding true
    }
}

dependencies {
    implementation 'androidx.core:core-ktx:1.7.0'
    implementation 'androidx.appcompat:appcompat:1.5.1'
    implementation 'com.google.android.material:material:1.7.0'
    implementation 'androidx.constraintlayout:constraintlayout:2.1.4'
    //implementation 'androidx.lifecycle:lifecycle-livedata-ktx:2.5.1'
    //implementation 'androidx.lifecycle:lifecycle-viewmodel-ktx:2.5.1'
    implementation 'androidx.navigation:navigation-fragment-ktx:2.5.3'
    implementation 'androidx.navigation:navigation-ui-ktx:2.5.3'
}
<?xml version="1.0" encoding="utf-8"?>
<androidx.constraintlayout.widget.ConstraintLayout
    xmlns:android="http://schemas.android.com/apk/res/android"
    xmlns:app="http://schemas.android.com/apk/res-auto"
    xmlns:tools="http://schemas.android.com/tools"
    android:layout_width="match_parent"
    android:layout_height="match_parent"
    app:layout_behavior="@string/appbar_scrolling_view_behavior"
    tools:showIn="@layout/app_bar_main">

    <!--Replace the <fragment> tag with FragmentContainerView. -->
    <androidx.fragment.app.FragmentContainerView
        android:id="@+id/nav_host_fragment_content_main"
        android:name="androidx.navigation.fragment.NavHostFragment"
        android:layout_width="match_parent"
        android:layout_height="match_parent"
        app:defaultNavHost="true"
        app:layout_constraintLeft_toLeftOf="parent"
        app:layout_constraintRight_toRightOf="parent"
        app:layout_constraintTop_toTopOf="parent"
        app:navGraph="@navigation/mobile_navigation" />
</androidx.constraintlayout.widget.ConstraintLayout>
That’s it. Run your app. Happy coding!
Hi, there. I like this lecture. Thank you. I am a beginner. I am making app with Navigation drawer. I want to make like this. There is a function for crawling web and when I click one of menu buttons on drawer bar, I want to see the result of crawling on some fragment. I tried again & again. But I couldn’t make this. Can u help me to make this function?
Hi, Thanks for asking the question. Please refer the demo code given below. Hope you can get some ideas.
public class ResultFrag extends Fragment
{
    private static final String ARG_PARAM1 = "param1";
    private static final String ARG_PARAM2 = "param2";
    private OnFragInterListener mListener;

    public ResultFrag(){}

	//change parameters ('param1', 'param2') with your requirement
    public static ResultFrag newInstance(String param1, String param2)
    {
        ResultFrag fragment = new ResultFrag();
        Bundle args = new Bundle();
        args.putString(ARG_PARAM1, param1);
        args.putString(ARG_PARAM2, param2);
        fragment.setArguments(args);
        return fragment;
    }

	@Override
    public void onStart()
    {
        super.onStart();

		if (getArguments() != null)
            {
			    //display result

                String name1 = getArguments().getString(ARG_PARAM1);
                String name2 = getArguments().getString(ARG_PARAM2);

				name1TextView.setText(name1);
				name2TextView.setText(name2);
			}
	}
}
//THIS IS JUST DEMONSTRATION CODE
public class MainActivity extends AppCompatActivity implements NavigationView.OnNavigationItemSelectedListener { public boolean onNavigationItemSelected(MenuItem item) { // Handle navigation view item clicks here. int id = item.getItemId(); if (id == R.id.nav_test) { // Handle the action setWebResultFrag(); } else if (id == R.id.nav_gallery) { //.... } DrawerLayout drawer = (DrawerLayout) findViewById(R.id.drawer_layout); drawer.closeDrawer(GravityCompat.START); return true; } private void setWebResultFrag() { //create parameter objects as per your requirement for example web results, etc String str1="hello1"; String str2="hello2"; //result fragment instance Fragment resultFragment = ResultFrag.newInstance(str1, str2); FragmentManager manager = getSupportFragmentManager(); FragmentTransaction transaction = manager.beginTransaction(); transaction.replace(R.id.frags, resultFragment); transaction.commit(); } } //THIS IS JUST DEMONSTRATION CODEHappy coding!