
8th February, 2023
Android Service is a amazing component of the Android application development. By using Android Service you can perform long running operations in the background. A simple example of Android Service is covered in this part to help you understand the basic concept of the Android Services.
Step 1: Create New Project
Create a new project in Android Studio from File ⇒ New Project and select Empty Activity from the templates.
Step 2: Create Android Service
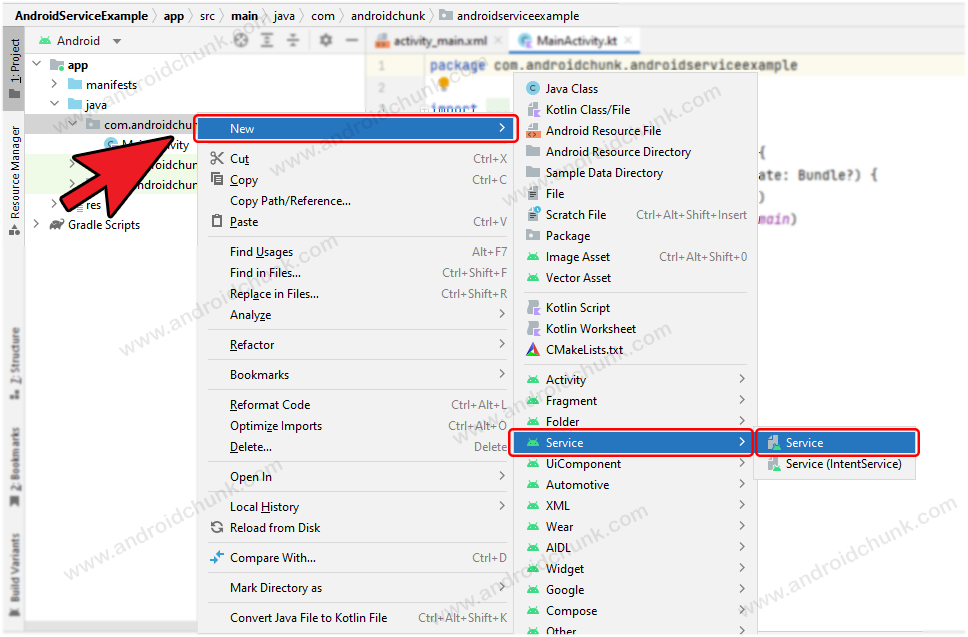
Creating Android Service using Android Studio is very easy. We already learnt it in the Android Service lesson. Open the project tool window and expand go to the directory app ⇒ java and right click on the package (or where you want to create a service class), select New ⇒ Service ⇒ Service.
Fill the details of new service class and click the Finish button.
Exported: Other app will use this service if it is true.
Enabled: Indicates that the system can initiate the service or not.

Very nice, the service class is ready to be edited. For this example, we’re going to play audio from the Android device.
package com.androidchunk.androidserviceexample

import android.app.Service
import android.content.Intent
import android.media.MediaPlayer
import android.os.IBinder
import android.provider.Settings

class MyService : Service() {

    //object of media player
    private lateinit var player: MediaPlayer

    // Service is ready to start, if you call to startService()
    override fun onStartCommand(intent: Intent?, flags: Int, startId: Int): Int {

        //this object will play the audio of default ringtone from the device
        player = MediaPlayer.create(this, Settings.System.DEFAULT_RINGTONE_URI)

        //loop audio
        player.isLooping = true

        //start player
        player.start()

        //status
        return START_STICKY
    }

    // when a client is bind to the service by calling bindService()
    // after onUnbind has already been called
    override fun onBind(intent: Intent): IBinder? {
        return null
    }

    // The service is no longer used and is being destroyed
    override fun onDestroy() {
        super.onDestroy()
        //stop the player
        player.stop()
    }
}
package com.androidchunk.androidserviceexample;

import android.app.Service;
import android.content.Intent;
import android.media.MediaPlayer;
import android.os.IBinder;
import android.provider.Settings;

import androidx.annotation.Nullable;

class MyService extends Service {

    //object of media player
    private MediaPlayer player;

    // Service is ready to start, if you call to startService()
    @Override
    public int onStartCommand(Intent intent, int flags, int startId) {
        //this object will play the audio of default ringtone from the device
        player = MediaPlayer.create(this, Settings.System.DEFAULT_RINGTONE_URI);

        //loop audio
        player.setLooping(true);

        //start player
        player.start();

        //status
        return START_STICKY;
    }

    // when a client is bind to the service by calling bindService()
    // after onUnbind has already been called
    @Nullable
    @Override
    public IBinder onBind(Intent intent) {
        return null;
    }

    // The service is no longer used and is being destroyed
    @Override
    public void onDestroy() {
        super.onDestroy();
        //stop the player
        player.stop();
    }
}
Did you notice that the onStartCommand() method returns ‘START_STICKY’ option in the above code ? START_STICKY..!?
You know that Android Services run in the background, so they consume memory (RAM). When the device’s memory runs low, The Android OS start terminating processes. What to do if your process is killed by the system?
→ If your service is killed by Android OS due to low memory and when the enough memory is available then based on this option the system…
| Option | Description |
| START_STICKY | Recreate the service (a fresh copy) |
| START_NOT_STICKY | Not recreate the service |
| START_REDELIVER_INTENT | Recreate the service and redeliver the same intent to onStartCommand() |
Step 3: Register Android Service in Androidmanifest.xml
The Android Service must be registered in the Androidmanifest.xml file. Android Studio has made this task easy for you. Android Studio has already registered your service to the Androidmanifest.xml file.
<?xml version="1.0" encoding="utf-8"?>
<manifest xmlns:android="http://schemas.android.com/apk/res/android"
    xmlns:tools="http://schemas.android.com/tools">

    <application>
         ...
         ...

        <service
            android:name=".MyService"
            android:enabled="true"
            android:exported="true" />

        <activity/>
         ...
         ...
    </application>

</manifest>
Step 4: Start/Stop Android Service
Step 4.1 Enable View Binding
In this example we are using Android Jetpack’s feature view binding.
plugins {
    id 'com.android.application'
    id 'org.jetbrains.kotlin.android'
}

android {
    ...
    ...

    buildFeatures {
        viewBinding = true
    }
    ...
    ...
}

dependencies {
    ...
    ...
    ...
}
Step 4.2 Add UI to handle the service
Create two buttons in the activity’s layout file that start/stop the service.
<?xml version="1.0" encoding="utf-8"?>
<LinearLayout xmlns:android="http://schemas.android.com/apk/res/android"
    xmlns:tools="http://schemas.android.com/tools"
    android:layout_width="match_parent"
    android:layout_height="match_parent"
    android:orientation="vertical"
    android:gravity="center"
    tools:context=".MainActivity">

    <Button
        android:id="@+id/playButton"
        android:layout_width="wrap_content"
        android:layout_height="wrap_content"
        android:text="Play Music" />
    <Button
        android:id="@+id/stopButton"
        android:layout_width="wrap_content"
        android:layout_height="wrap_content"
        android:text="Stop Music" />

</LinearLayout>
Step 4.3 Update Activity
Create an instance of the Intent class where the first parameter is the current Activity context and the second parameter is an instance of the Service class.
package com.androidchunk.androidserviceexample

import android.content.Intent
import android.os.Bundle
import androidx.appcompat.app.AppCompatActivity
import com.androidchunk.androidserviceexample.databinding.ActivityMainBinding

class MainActivity : AppCompatActivity() {

    //view binding
    private lateinit var binding: ActivityMainBinding

    override fun onCreate(savedInstanceState: Bundle?) {
        super.onCreate(savedInstanceState)
        binding = ActivityMainBinding.inflate(layoutInflater)
        setContentView(binding.root)

        //create an instance of the intent class
        val intent = Intent(this, MyService::class.java)

        //handle play button click
        binding.playButton.setOnClickListener {
            //start service
            startService(intent)
        }

        //handle sto button click
        binding.stopButton.setOnClickListener {
            //stop service
            stopService(intent)
        }
    }
}
package com.androidchunk.androidserviceexample;

import android.content.Intent;
import android.os.Bundle;
import androidx.appcompat.app.AppCompatActivity;
import com.androidchunk.androidserviceexample.databinding.ActivityMainBinding;

public class MainActivity extends AppCompatActivity {

    //view binding
    private ActivityMainBinding binding;

    @Override
    protected void onCreate(Bundle savedInstanceState) {
        super.onCreate(savedInstanceState);
        binding = ActivityMainBinding.inflate(getLayoutInflater());
        setContentView(binding.getRoot());

        //create an instance of the intent class
        Intent intent = new Intent(this, MyService.class);

        //handle play button click
        binding.playButton.setOnClickListener(view -> {
            //start service
            startService(intent);
        });

        //handle sto button click
        binding.stopButton.setOnClickListener(view -> {
            //stop service
            stopService(intent);
        });
    }
}
Output
Happy coding!