
21st February, 2023
TextView is a User Interface (UI) used to display text labels in Android. We can create Android TextView in two ways. Using an XML layout file or programmatically.
1. How to Create Android TextView
1.1 Create TextView using XML layout file
From the Android Studio, open the layout file and select a textView from the palette and drag and drop it onto the layout.
<?xml version="1.0" encoding="utf-8"?>
<RelativeLayout xmlns:android="http://schemas.android.com/apk/res/android"
    xmlns:tools="http://schemas.android.com/tools"
    android:layout_width="match_parent"
    android:layout_height="match_parent"
    tools:context=".MainActivity">

    <!--textView in layout file-->
    <TextView
        android:id="@+id/textView1"
        android:layout_width="wrap_content"
        android:layout_height="wrap_content"
        android:text="Hello Androidchunk!" />
</RelativeLayout>
1.1 Create TextView Programmatically in Android
In other way, you can programmatically create Android textView as shown in the sample code below.
package com.androidchunk.hellotextview

import android.os.Bundle
import android.widget.LinearLayout
import android.widget.TextView
import androidx.appcompat.app.AppCompatActivity

class MainActivity : AppCompatActivity() {
    override fun onCreate(savedInstanceState: Bundle?) {
        super.onCreate(savedInstanceState)
        setContentView(R.layout.activity_main)

        val aLayout = findViewById<LinearLayout>(R.id.linearlayout)

        val myTextView = TextView(this)
        myTextView.text = "Hello Androidchunk!"

        aLayout.addView(myTextView)
    }
}
package com.androidchunk.hellotextview;

import android.os.Bundle;
import android.widget.LinearLayout;
import android.widget.TextView;

import androidx.annotation.Nullable;
import androidx.appcompat.app.AppCompatActivity;

class MainActivity extends AppCompatActivity {

   @Override
   protected void onCreate(@Nullable Bundle savedInstanceState) {
      super.onCreate(savedInstanceState);

      LinearLayout aLayout = findViewById(R.id.linearlayout);

      TextView myTextView = new TextView(this);
      myTextView.setText("Hello Androidchunk!");

      aLayout.addView(myTextView);
   }
}
2. Android TextView Attributes
These are some frequently used attributes of Android TextView.
| Attribute | Description |
|---|---|
| android: id | It is used to uniquely identify the textView |
| android:width | Sets the width of textView |
| android:height | Sets the height of textView |
| android:text | It is used to display text |
| android:textSize | Used to specify the text size |
| android:textStyle | It is used to styling the textView. E.g. Bold, Italic |
| android:textAllCaps | It displays all text in capital latters |
| android:textColor | sets color of textView |
| android:typeface | Specifies the typeface like normal, sans, serif. |
| android:minWidth | Sets the minimum width of textView |
| android:maxWidth | Sets the maximum width of textView |
| android:autoLink | It automatically detects hyperlinks or email links and makes them clickable |
| android: ems | Sets width of textView in ems |
| android:inputType | Sets type of TextView like number, Password, Phone, etc |
| android:fontFamily | Specifies the font family of textView |
3. Android TextView Example
In this example, we will learn about Android TextView and its attributes.
Step 3.1: Create New Project
Create a new project in Android Studio from File ⇒ New Project and select Empty Activity from the templates.
Step 3.2: Create/Add Android TextView
Some Android TextView samples are given in the code below.
<?xml version="1.0" encoding="utf-8"?>
<LinearLayout xmlns:android="http://schemas.android.com/apk/res/android"
    xmlns:tools="http://schemas.android.com/tools"
    android:layout_width="match_parent"
    android:layout_height="match_parent"
    android:orientation="vertical"
    android:padding="5dp"
    tools:context=".MainActivity">

    <TextView
        android:id="@+id/textView1"
        android:layout_width="wrap_content"
        android:layout_height="wrap_content"
        android:layout_marginTop="15dp"
        android:text="I am simple Android TextView!" />

    <TextView
        android:id="@+id/textView2"
        android:layout_width="wrap_content"
        android:layout_height="wrap_content"
        android:layout_marginTop="15dp"
        android:text="I am a pink textView"
        android:textColor="#FF00FF"
        android:textSize="18sp" />

    <TextView
        android:id="@+id/textView3"
        android:layout_width="match_parent"
        android:layout_height="wrap_content"
        android:layout_marginTop="15dp"
        android:text="I am bold textView"
        android:textColor="#0288D1"
        android:textStyle="bold" />

    <TextView
        android:id="@+id/textView4"
        android:layout_width="match_parent"
        android:layout_height="wrap_content"
        android:layout_marginTop="15dp"
        android:background="@color/black"
        android:text="I am a text view with a black background"
        android:textColor="#FFFFFF"
        android:textSize="16sp"
        android:textStyle="bold" />

    <TextView
        android:id="@+id/textView5"
        android:layout_width="match_parent"
        android:layout_height="wrap_content"
        android:layout_marginTop="15dp"
        android:autoLink="web"
        android:text="For more info visit website https://androidchunk.com" />

</LinearLayout>
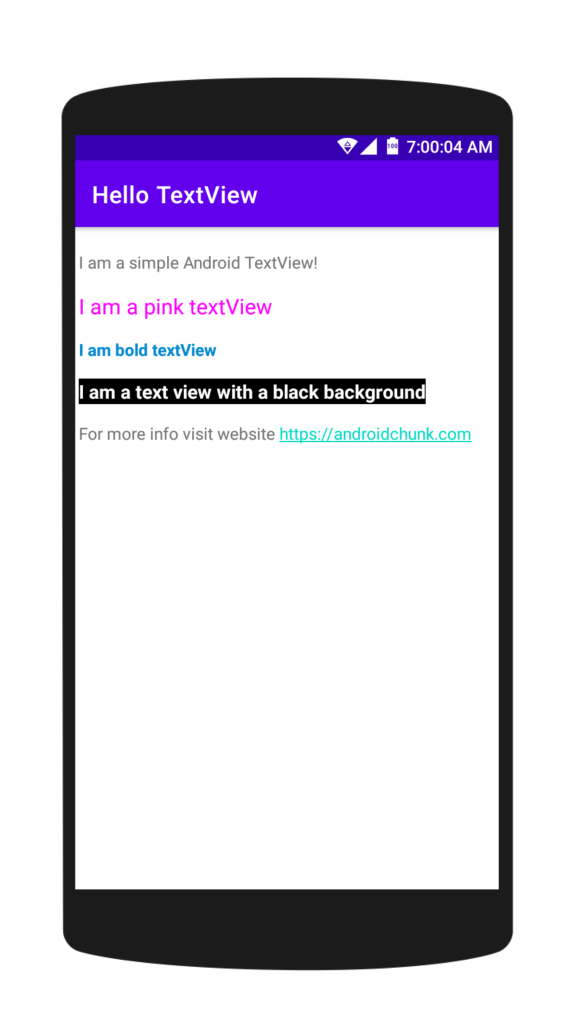
Step 3.3: Output
4. Create TextView Programmatically in Kotlin/Java Android
Well, In previous example we created textViews using layout file. Let’s create those textViews programmatically.
Step 4.1: Create New Project
Create a new project in Android Studio from File ⇒ New Project and select Empty Activity from the templates.
Step 4.2: Create TextView in Kotlin/Java code
Open the Kotlin/Java Main activity and add the following code.
package com.androidchunk.hellotextview

import android.graphics.Color
import android.graphics.Typeface
import androidx.appcompat.app.AppCompatActivity
import android.os.Bundle
import android.text.util.Linkify
import android.view.ViewGroup
import android.widget.LinearLayout
import android.widget.TextView

class TestActivity : AppCompatActivity() {
    override fun onCreate(savedInstanceState: Bundle?) {
        super.onCreate(savedInstanceState)
        setContentView(R.layout.activity_test)

        //reference of root layout
        val aLayout = findViewById<LinearLayout>(R.id.rootLayout)

        //layout parameters
        val layoutParams = LinearLayout.LayoutParams(
            ViewGroup.LayoutParams.WRAP_CONTENT,
            ViewGroup.LayoutParams.WRAP_CONTENT
        )
        layoutParams.setMargins(0, 15, 0, 0)

        //1st textView
        val textView1 = TextView(this)
        textView1.text = "I am a simple Android TextView!"

        //2st textView
        val textView2 = TextView(this)
        textView2.text = "I am a pink textView"
        textView2.setTextColor(Color.parseColor("#FF00FF"))
        textView2.textSize = 18f

        //3rd textView
        val textView3 = TextView(this)
        textView3.text = "I am bold textView"
        textView3.setTextColor(Color.parseColor("#0288D1"))
        textView3.setTypeface(textView3.typeface, Typeface.BOLD)

        //4th textView
        val textView4 = TextView(this)
        textView4.text = "I am a text view with a black background"
        textView4.setTextColor(Color.WHITE)
        textView4.setTypeface(textView3.typeface, Typeface.BOLD)
        textView4.textSize = 16f
        textView4.setBackgroundColor(Color.BLACK)

        //5th textView
        val textView5 = TextView(this)
        textView5.text = "For more info visit website https://androidchunk.com"
        Linkify.addLinks(textView5, Linkify.WEB_URLS)
        textView5.linksClickable = true

        //add textViews to layout
        aLayout.addView(textView1, layoutParams)
        aLayout.addView(textView2, layoutParams)
        aLayout.addView(textView3, layoutParams)
        aLayout.addView(textView4, layoutParams)
        aLayout.addView(textView5, layoutParams)
    }
}
package com.androidchunk.hellotextview;

import android.graphics.Color;
import android.graphics.Typeface;
import android.os.Bundle;
import android.text.util.Linkify;
import android.view.ViewGroup;
import android.widget.LinearLayout;
import android.widget.TextView;

import androidx.annotation.Nullable;
import androidx.appcompat.app.AppCompatActivity;

class TestActivity extends AppCompatActivity {
    @Override
    protected void onCreate(@Nullable Bundle savedInstanceState) {
        super.onCreate(savedInstanceState);
        setContentView(R.layout.activity_test);

        //reference of root layout
        LinearLayout aLayout = findViewById(R.id.rootLayout);

        //layout parameters
        LinearLayout.LayoutParams layoutParams = new LinearLayout.LayoutParams(
                ViewGroup.LayoutParams.WRAP_CONTENT,
                ViewGroup.LayoutParams.WRAP_CONTENT
        );
        layoutParams.setMargins(0, 15, 0, 0);

        //1st textView
        TextView textView1 = new TextView(this);
        textView1.setText("I am a simple Android TextView!");

        //2st textView
        TextView textView2 = new TextView(this);
        textView2.setText("I am a pink textView");
        textView2.setTextColor(Color.parseColor("#FF00FF"));
        textView2.setTextSize(18f);

        //3rd textView
        TextView textView3 = new TextView(this);
        textView3.setText("I am bold textView");
        textView3.setTextColor(Color.parseColor("#0288D1"));
        textView3.setTypeface(textView3.getTypeface(), Typeface.BOLD);

        //4th textView
        TextView textView4 = new TextView(this);
        textView4.setText("I am a text view with a black background");
        textView4.setTextColor(Color.WHITE);
        textView4.setTypeface(textView3.getTypeface(), Typeface.BOLD);
        textView4.setTextSize(16f);
        textView4.setBackgroundColor(Color.BLACK);

        //5th textView
        TextView textView5 = new TextView(this);
        textView5.setText("For more info visit website https://androidchunk.com");
        Linkify.addLinks(textView5, Linkify.WEB_URLS);
        textView5.setLinksClickable(true);

        //add textViews to layout
        aLayout.addView(textView1, layoutParams);
        aLayout.addView(textView2, layoutParams);
        aLayout.addView(textView3, layoutParams);
        aLayout.addView(textView4, layoutParams);
        aLayout.addView(textView5, layoutParams);
    }
}
Step 4.2: Output

Happy coding!